
The concept of the no-bake cheesecake is a clever evolution of the classic New York style, trading the heat of the oven for the steady chill of the refrigerator. While traditional cheesecakes rely on eggs for structure, these Oreo no-bake cheesecake cups use the stability of whipped cream and softened cream cheese to create a light, mousse-like consistency that feels more like a cloud than a cake.
Oreo cookies, since their debut in 1912, have become a global cultural icon, often paired with milk and shared across generations. By transforming these cookies into a buttery crust using 6 tablespoons (3 ounces) unsalted butter and ¼ cup granulated sugar, the dessert bridges the gap between a simple snack and a sophisticated plated treat.
This style of individual serving grew in popularity as home cooks sought ways to make desserts more manageable for gatherings. The use of a muffin tin allows for perfectly portioned bites, making the decadence of the chocolate and cream accessible and easy to share without the stress of slicing a massive cake.
Integrating the distinct crunch of the cookie with the airy sweetness of the filling creates a sensory experience that is both nostalgic and refined. It is a testament to how simple ingredients can be elevated into something that feels truly indulgent.
Why You'll Love It
-
- Honestly, there is just something so comforting about a dessert that doesn't require the oven, especially on a warm afternoon.
-
- These little cups have that perfect balance of a crunchy Oreo cookie crumbs base and a cloud-like filling that just melts away.
-
- I mean, they look so fancy for a party, but they are actually quite simple to pull together with a bit of patience.
-
- Well, look, the way the chocolatey goodness hits you in every bite... it's a little slice of heaven, really.
"Honestly, these are the only treats I bring to the party now. My grandkids absolutely adore the chocolatey crunch!"
Essential Ingredient Guide
- 16 ounces cream cheese: This is the heart of the filling. Please, make sure it's softened to room temperature or you'll end up with lumps, and ugh, that's just no fun.
- 8 ounces heavy cream: Keep this cold, right from the fridge. When you whip it up, it creates that lovely, airy lift that makes the cheesecake feel like a dream.
- 12 whole Oreo cookies: These are just for the top, but they add such a professional look. It's the little things that make a treat feel special, yeah?
- 1 teaspoon vanilla extract: Just a splash, but it rounds out the sugar and cream perfectly. It gives the filling a warm, homey scent that I just love.
- 6 tablespoons (3 ounces) unsalted butter: Melt this gently so it can bind the crumbs together. It gives the crust that rich, buttery feel that holds everything in place.
- 1 cup powdered sugar: I find powdered sugar blends in so much more smoothly than granulated. It keeps the texture velvety and sweet without any grit.
Complete Cooking Process
-
Getting Everything Ready:
Start by letting your 16 ounces cream cheese sit out until it's soft. While that's happening, go ahead and crush those Oreos—it's a bit therapeutic, honestly.
-
Building the Flavor:
The magic happens when the 1 teaspoon vanilla extract and 1 cup powdered sugar meet the cream cheese. That's where that classic, sweet cheesecake taste really begins to bloom.
-
Achieving the Right Texture:
The real secret is in the folding. Gently stirring the whipped 8 ounces heavy cream into the cheese ensures the filling stays light and fluffy rather than dense.
-
The Final Flourish:
Once they've chilled, just pop a whole Oreo cookie on top of each. It's a simple touch, but wow, it makes the whole tray look so inviting.
-
The Waiting Game:
Patience is key here. Let them set for at least 4 hours—or even overnight—so every bite is firm and perfectly chilled.
-
Use dark chocolate Oreo cookies for a deeper, richer crust if you're feeling indulgent.
-
Ensure that cream cheese is fully softened to keep your filling smooth and lump-free.
-
Watch your heavy cream closely; you want stiff peaks, but don't let it turn into butter, oops!
-
Fold the whipped cream in gently with a spatula to keep all that lovely air inside.
Pro Tips
Just take your time and enjoy the process, you've got this!

Better For You Treats
Ways to Make it Your Own
Serving Suggestions
Frequently Asked Questions
→ Can I make these ahead of time?
Oh, absolutely! In fact, I'd recommend making them overnight so they have plenty of time to set and the flavors can really meld together.
→ What if my filling isn't firm enough?
Well, just pop them back in the fridge for another hour or two. Sometimes the humidity in the kitchen can make them a bit softer than usual.
→ Can I freeze these for later?
Yeah, you can freeze them for up to a month! Just remember to thaw them in the refrigerator overnight before you serve them so they regain that creamy texture.
Nutrition Facts
per serving
410
Calories
5g
Protein
32g
Carbs
28g
Fat
Taste Profile
A rich, creamy blend of tangy cheesecake and deep chocolate cookie flavor.
Ingredient Substitutions
Don't have an ingredient? Try these alternatives
Will be slightly less sweet and have a different crunch.
A good alternative for a slightly different flavor profile.
Ensure it is at least 36% fat to get those stiff peaks.
Recipe Variations
Try these delicious twists on the original
Mint Chocolate Oreo Cheesecake Cups
For a refreshing twist, add ½ teaspoon of peppermint extract to the cheesecake filling and use Mint Oreo cookies for both the crust and the garnish.
Peanut Butter Oreo Cheesecake Cups
Give it a nutty depth by swirling in 2 tablespoons of peanut butter into the cheesecake filling just before you chill them.
Common Mistakes to Avoid
Learn from others' mistakes for perfect results
- Using cold cream cheese, which leads to those annoying little lumps in the filling.
- Overmixing the whipped cream into the cheese, which makes the filling dense instead of fluffy.
- Not packing the crust firmly enough, causing it to fall apart when you take a bite.
Meal Prep & Storage
Make Ahead Tips
These are actually better when made ahead! I recommend making them the night before so they have plenty of time to set in the refrigerator.
Leftover Ideas
Keep them stored in the refrigerator covered with plastic wrap. If you're feeling adventurous, you can freeze them, but just let them thaw in the fridge overnight before eating.
Perfect Pairings
Serve this with...
Cooking Timeline
Crush cookies and mix with sugar and melted butter.
Press crusts into liners and place in the refrigerator.
Beat cream cheese with powdered sugar and vanilla.
Whip heavy cream and gently fold into the cheese mixture.
Fill cups and refrigerate for 4 hours or overnight.
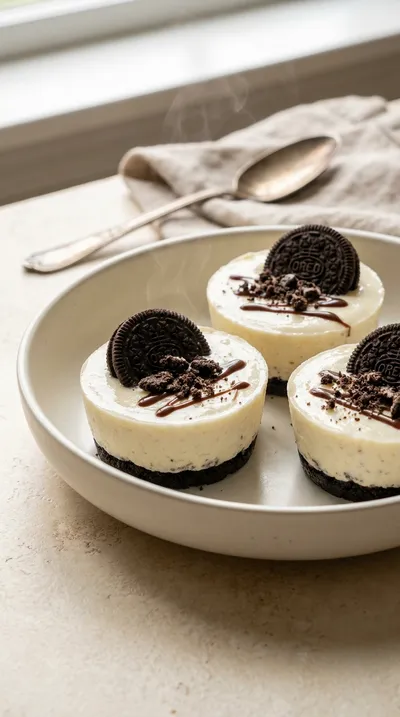
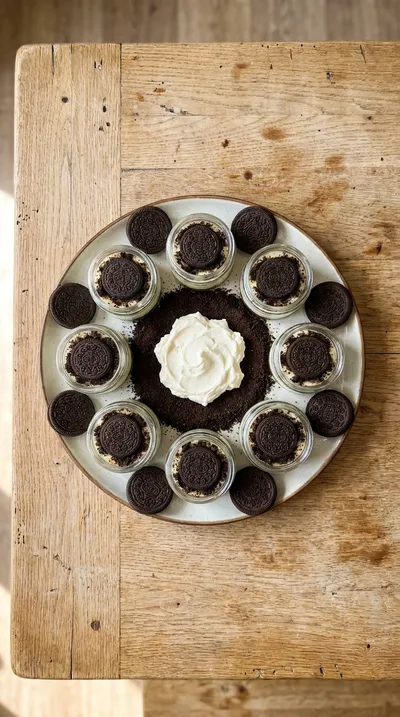
Oreo No-Bake Cheesecake Cups
These Oreo no-bake cheesecake cups are a dreamy blend of crushed cookies and velvety cream. They offer a rich, chocolatey crunch and a smooth finish that feels like a little hug in every bite.
Timing
Prep Time
20 Minutes
Cook Time
0 Minutes
Total Time
20 Minutes
Recipe Details
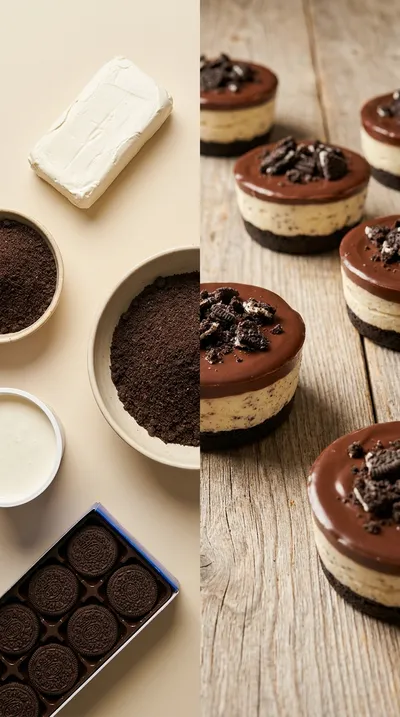
Ingredients
For the Crust
-
01
1 ½ cups Oreo cookie crumbs (about 24 Oreos, finely crushed)
-
02
¼ cup granulated sugar
-
03
6 tablespoons (3 ounces) unsalted butter, melted
For the Cheesecake Filling
-
01
16 ounces cream cheese, softened to room temperature
-
02
1 cup powdered sugar
-
03
1 teaspoon vanilla extract
-
04
8 ounces heavy cream, cold
Garnish
-
01
12 whole Oreo cookies, for garnish (optional)
Instructions
Let's get that crust started. In a medium bowl, just combine your 1 ½ cups Oreo cookie crumbs, ¼ cup granulated sugar, and those 6 tablespoons (3 ounces) unsalted butter, melted. Mix it all together until the crumbs are evenly moistened and look just right.
Now, line your muffin tin with 12 silicone cupcake liners. Spoon about 2-3 tablespoons of that chocolatey crumb mixture into the bottom of each liner, pressing down firmly to make a sturdy little base. Pop them in the refrigerator for at least 10 minutes while we work on the filling; they just need a moment to set.
In a large mixing bowl, beat your 16 ounces cream cheese, softened to room temperature, with an electric mixer. Go for about 2-3 minutes until it's smooth and creamy. Honestly, just make sure there are no lumps left—it makes such a difference.
Gradually add the 1 cup powdered sugar to the cream cheese. Keep the mixer on low speed so the sugar doesn't fly everywhere, beating until it's fully incorporated. Well, be careful not to overmix here. Stir in your 1 teaspoon vanilla extract and you're set.
In a separate bowl that's been chilled, whip your 8 ounces heavy cream, cold, using the electric mixer. Start low and move up to high speed until you get those lovely stiff peaks. This usually takes about 3-5 minutes.
Now for the gentle part. Using a rubber spatula, fold the whipped cream into the cream cheese mixture in two additions. Just fold it in until it's combined—don't overdo it, or you'll lose all that wonderful airiness we just whipped in.
Take your muffin tin back out of the fridge. Carefully spoon the cheesecake filling evenly into each of those chilled crust-lined cups, filling them all the way to the top.
Cover the tin with a bit of plastic wrap and let them rest in the refrigerator for at least 4 hours. Honestly, I'd suggest leaving them overnight if you can manage the wait, just to make sure they set completely.
Right before you serve them up, you can garnish each Oreo No-Bake Cheesecake Cup with a whole Oreo cookie. It's just a little something extra to make them look special.
Notes & Tips
-
1
Make sure the cream cheese is truly at room temperature to avoid a lumpy filling.
-
2
Chill your heavy cream and mixing bowl for the best whipped peaks.
-
3
Don't rush the setting time; overnight is always better for a clean slice.
 Homestyle & Traditional Recipes
Traditional Bolognese Sauce Recipe
A classic Italian meat sauce that simmers to perfection with rich, comforting flavors
Tools You'll Need
-
9-inch pie plate or food processor for crushing cookies
-
2 large mixing bowls for the base and filling
-
Electric mixer (either handheld or stand mixer)
-
Rubber spatula for gentle folding
-
12 silicone cupcake liners to prevent sticking
-
Muffin tin for shaping the cups
Must-Know Tips
-
Softened Cream Cheese, ensure it is room temperature to prevent lumps in the cheesecake filling.
-
Whipping Caution, don't overwhip the heavy cream; stiff peaks are ideal, but be careful not to turn it into butter!
-
Crust Texture, press the crumbs firmly into the liners so the base doesn't crumble when serving.
Professional Secrets
-
Fold in the whipped cream in two stages to preserve the aerated structure of the filling.
-
Using silicone liners instead of paper ones provides a much cleaner release for individual desserts.
-
The 10-minute pre-chill of the crust prevents the filling from soaking too deeply into the base.

Recipe by
Isabella MooreCelebrating life with flavor 🎉🍽️ Creating magical seasonal dishes full of warmth, joy, and delicious taste ✨
Get Delicious Recipes Weekly
Join 25,000+ home cooks getting our best recipes straight to their inbox.
Free forever • No spam • Unsubscribe anytime