
These tiny treats trace their roots to the American pastime of assembling simple desserts without a kitchen full of heat. In the 1950s, home cooks discovered that a blend of cream cheese and crushed cookies could set in the refrigerator, offering a quick indulgence. The result was a dessert that felt both nostalgic and modern, bridging generations with its chocolatey crunch and creamy heart.
Why You'll Love It
-
- No oven needed, just a fridge
-
- Ready in under an hour
-
- Creamy texture with a chocolate snap
-
- Easy to scale for parties or quiet nights
"These bites are the perfect balance of creamy and crunchy—my guests keep asking for the recipe!"
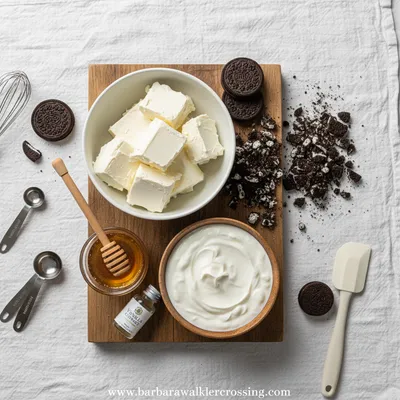
Essential Ingredient Guide
- Oreo cookies: Choose full‑size cookies; they provide the perfect crumb and chocolate flavor when crushed.
- Cream cheese: Use room‑temperature cream cheese so it mixes smoothly without lumps.
- Greek yogurt: Adds a light tang and keeps the filling from feeling heavy.
- Vanilla extract: A splash brightens the creamy base without overwhelming the chocolate.
- Lemon zest: A tiny amount lifts the richness and adds a fresh aroma.
- Honey: Just enough to sweeten naturally; you can adjust to taste.

Complete Cooking Process
-
Ingredient Readiness:
Gather cookies, soften cream cheese, and measure yogurt so everything is at hand before you start.
-
Flavor Development:
Mix the cream cheese, yogurt, honey, vanilla, and zest until silky, then fold in the crushed cookies.
-
Texture Control:
Press the mixture into mini silicone molds, ensuring an even crust and a smooth top.
-
Finishing Touches:
Chill until set, then drizzle a touch of melted chocolate or dust with cocoa powder.
-
Serving Timing:
Serve straight from the fridge; the bites are best enjoyed within 24 hours for peak freshness.
-
Use a food processor for uniform cookie crumbs.
-
Tap the molds on the counter to settle the mixture evenly.
-
Add a pinch of sea salt on top for flavor contrast.
-
Store in an airtight container to keep the texture perfect.
Pro Tips
Well, I’ve found that the tiniest adjustments make the biggest difference. A little extra chill time lets the flavors meld, and a whisper of salt brightens the chocolate. So, when you’re ready, just let the bites rest and watch the anticipation grow. It’s a quiet ritual, and the result is worth the gentle patience.
 Baking, Bread & Sweet Comforts
High Protein Cookie Dough
Nutritious cookie dough loaded with protein, easy to whip up and enjoy any time.
The essence of the dish:
The bite captures the crunch of an Oreo cookie crust, a silky cream cheese heart, and a faint citrus lift that keeps it from feeling cloying.
A fun fact or historical angle:
When refrigerators became common in the 1930s, home bakers invented no‑bake desserts to keep kitchens cooler during summer.
Flavor or sensory focus:
Expect the first taste of chocolatey crunch, followed by a cool, creamy wave with a subtle hint of lemon and vanilla.
You Must Know
-
Chill for at least 45 minutes
-
Don’t over‑mix the crumb base
-
Use fresh cream cheese
Frequently Asked Questions
→ Can I make these ahead of time?
Yes, they keep well refrigerated for up to three days; just keep them covered.
→ What if I don’t have Greek yogurt?
Plain regular yogurt works fine, though Greek gives a firmer bite.
→ Can I use a different cookie?
Chocolate wafer or graham crackers can substitute, but the Oreo flavor is iconic.
→ Do I need to melt the chocolate topping?
A quick microwave burst or a double‑boiler works; stir until smooth.
→ Is this recipe gluten‑free?
Not with traditional Oreo cookies; gluten‑free chocolate sandwich cookies can be used.
→ How many bites does the recipe yield?
About 24 mini bites, depending on the size of your silicone molds.
Nutrition Facts
per serving
120
Calories
2g
Protein
13g
Carbs
7g
Fat
Taste Profile
Creamy chocolate with a gentle citrus lift
Ingredient Substitutions
Don't have an ingredient? Try these alternatives
Choose a brand that melts well; you may need a touch more yogurt for consistency.
Provides similar sweetness with a subtle maple note.
Recipe Variations
Try these delicious twists on the original
Spicy Version
Add a pinch of cayenne pepper to the filling and drizzle with chocolate infused with chili flakes.
Mediterranean Style
Swap half the Oreo crumbs for finely crushed pistachios and finish with a drizzle of honey.
Common Mistakes to Avoid
Learn from others' mistakes for perfect results
- Over‑mixing the crumb base, which makes it soggy.
- Not allowing enough chilling time, resulting in a loose bite.
- Using cold cream cheese, leading to lumps in the filling.
Meal Prep & Storage
Make Ahead Tips
You can prepare the bites up to two days in advance; keep them covered and chilled, then add the chocolate drizzle just before serving.
Leftover Ideas
Re‑chill and enjoy; if the texture softens, a quick flash in the freezer for 10 minutes restores firmness.
Perfect Pairings
Serve this with...
Cooking Timeline
Gather all ingredients and equipment; crush the cookies.
Beat cream cheese, yogurt, honey, vanilla, and lemon zest together.
Fold in cookie crumbs, press mixture into molds, and garnish.
Chill in the refrigerator until set.
Drizzle melted chocolate, add a pinch of salt, and serve.
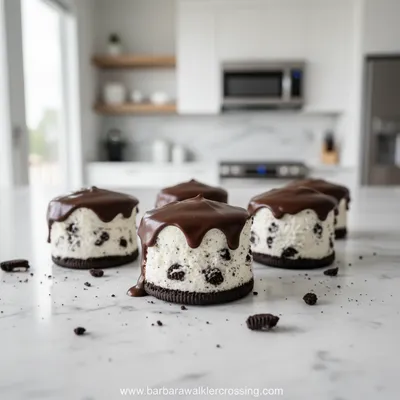
No-Bake Oreo Cheesecake Bites
A velvety, chocolate‑kissed bite that needs no oven, just a fridge and a quiet moment. Creamy, smooth, and just a touch of crunch from the cookie base.
Timing
Prep Time
15 Minutes
Cook Time
0 Minutes
Total Time
1 Hour
Recipe Details
Ingredients
Main Ingredients
-
01
24 Oreo cookies, crushed
-
02
8 oz cream cheese, softened
-
03
1/2 cup Greek yogurt
-
04
2 tbsp honey
-
05
1 tsp vanilla extract
-
06
1 tsp lemon zest
For the Topping
-
01
2 tbsp melted dark chocolate
-
02
A pinch of sea salt (optional)
Instructions
Break the Oreo cookies into a large bowl and pulse in a food processor until fine; set aside a tablespoon for garnish.
In a mixing bowl, beat the softened cream cheese with Greek yogurt, honey, vanilla, and lemon zest until smooth; I mean, just keep it gentle so no lumps appear.
Fold the cookie crumbs into the cream mixture, reserving the garnish crumbs; the texture should feel thick but spreadable.
Spoon the batter into silicone mini molds, pressing down lightly; then drizzle each bite with melted chocolate and sprinkle the reserved crumbs.
Place the tray in the refrigerator for 45 minutes to set; optional, add a pinch of sea salt on top just before serving.
Notes & Tips
-
1
If the mixture feels too soft, add a few more crushed cookies to firm it up.
-
2
For a dairy‑free version, substitute cream cheese with a plant‑based alternative and use coconut yogurt.
-
3
A quick look at the cheesecake cups shows a similar method with a larger format.

Tools You'll Need
-
Food processor or zip‑lock bag and rolling pin
-
Mixing bowls
-
Hand mixer or whisk
-
Mini silicone molds
-
Spatula
-
Microwave-safe bowl for chocolate
Must-Know Tips
-
Don’t over‑mix the crust; it can become soggy.
-
Let the cream cheese soften at room temperature for a smooth blend.
-
Taste the filling before chilling; adjust honey or lemon if needed.
Professional Secrets
-
Use a chilled bowl for the cream cheese to keep the mixture firm.
-
Press the crumb base evenly to avoid air pockets.
-
A quick flash of sea salt on chocolate heightens the sweet‑bitter balance.

Recipe by
Barbara WalkerCooking with heart and heritage 🥘❤️ Sharing nostalgic flavors, family comfort, and timeless kitchen love ✨
Get Delicious Recipes Weekly
Join 25,000+ home cooks getting our best recipes straight to their inbox.
Free forever • No spam • Unsubscribe anytime