
The origins of no‑bake cheesecake trace back to bustling American kitchens where time was precious and dessert still needed to impress. By combining crushed cookies with a creamy filling, this style offered a quicker alternative to the traditional baked version, yet retained that rich, velvety feel. It became a favorite at gatherings, showcasing how simple ingredients could create a memorable sweet experience.
Why You'll Love It
-
- No oven needed, perfect for summer evenings
-
- Creamy texture with a crunchy Oreo base
-
- Easy to portion and serve
-
- Versatile for toppings and mix‑ins
"These little cups are my go‑to for guests—so pretty and perfectly creamy!"
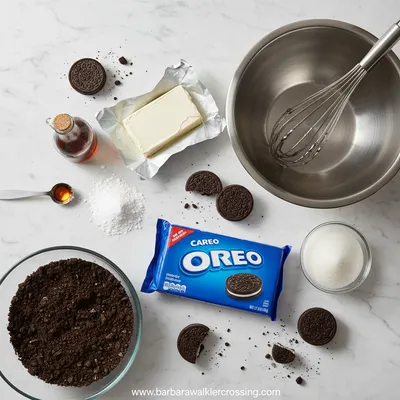
Essential Ingredient Guide
- Oreo cookies: Use full‑fat cookies for the richest crumb; crush finely for even texture.
- Cream cheese: Room‑temperature cheese blends smoothly, preventing lumps.
- Powdered sugar: Adds sweetness without gritty texture; sift to avoid clumps.
- Vanilla extract: A splash brightens the flavor; use pure extract for best aroma.
- Lemon juice: A touch of acidity balances the sweetness and lifts the cream.
- Whipped topping: Folds in lightness; choose a stable brand for firm cups.
Complete Cooking Process
-
Ingredient Readiness:
Gather all ingredients, bring cream cheese to room temperature, and crush cookies into fine crumbs.
-
Flavor Development:
Blend cream cheese, sugar, vanilla, and lemon until silky; the aroma will fill the kitchen.
-
Texture Control:
Layer the buttery crumb and creamy filling in cups, ensuring a smooth top.
-
Finishing Touches:
Top each cup with a dollop of whipped topping and a garnish of crushed Oreo.
-
Serving Timing:
Chill for at least 2 hours; serve cold for the best contrast of cool cream and crisp crumb.
-
Press the cookie crust firmly for stability.
-
Add a dash of espresso powder for depth.
-
Use a piping bag for a neat topping swirl.
-
Freeze overnight for a firmer bite.
Pro Tips
Well, these small tweaks can turn a good cup into something unforgettable. I remember once adding a tiny pinch of sea salt; the balance was just wow. So, take a moment, enjoy the process, and let the flavors settle.

The essence of the dish:
A buttery Oreo crust cradles a silky, lightly tangy cheesecake filling, creating a harmonious bite that feels both familiar and fresh.
A fun fact or historical angle:
No‑bake cheesecakes surged in popularity during the 1950s, when refrigerators became common in American homes.
Flavor or sensory focus:
You’ll notice the contrast of the chocolate‑y cookie crunch against the cool, creamy center, with a whisper of citrus brightening the palate.
You Must Know
-
Use full‑fat cream cheese for richness.
-
Crush cookies evenly for a uniform base.
-
Chill thoroughly to set the filling.
Frequently Asked Questions
→ Can I use gluten‑free cookies?
Yes, substitute gluten‑free chocolate wafers; the texture remains similar.
→ How long can the cups be stored?
Keep refrigerated in an airtight container for up to 3 days.
→ Can I add chocolate chips?
Stir in mini chocolate chips into the filling for extra texture.
→ Do I need a food processor for crumbs?
A zip‑top bag and rolling pin work fine; just crush until fine.
→ Is it okay to use low‑fat cream cheese?
You can, but the texture will be less rich and may need a bit more sugar.
→ What toppings work best?
Try whipped topping, fresh berries, or a drizzle of melted chocolate.
Nutrition Facts
per serving
280
Calories
4g
Protein
24g
Carbs
18g
Fat
Taste Profile
Creamy with a chocolate‑crisp finish
Ingredient Substitutions
Don't have an ingredient? Try these alternatives
Yogurt gives a lighter texture; strain if needed.
Provides a slightly less sweet but still crunchy base.
Recipe Variations
Try these delicious twists on the original
Spicy Version
Add a pinch of cayenne and drizzle a little chocolate for a subtle kick.
Mediterranean Style
Mix in a teaspoon of orange zest and top with a drizzle of honey.
Common Mistakes to Avoid
Learn from others' mistakes for perfect results
- Over‑mixing the filling, which can make it dense.
- Using cold cream cheese, leading to lumps.
- Skipping the chilling step, resulting in runny cups.
Meal Prep & Storage
Make Ahead Tips
You can crush the crust and store it in a sealed bag for up to one week; mix the filling a day ahead and keep refrigerated until ready to assemble.
Leftover Ideas
Reheat gently in a microwave for 10 seconds if you prefer a softer texture, or enjoy cold straight from the fridge.
Perfect Pairings
Serve this with...
Cooking Timeline
Prepare crust: crush cookies, melt butter, press into cups.
Beat cream cheese until smooth, add sugar, vanilla, lemon.
Fold in whipped topping gently.
Fill cups, smooth tops, sprinkle garnish.
Refrigerate to set before serving.
 Baking, Bread & Sweet Comforts
High Protein Cookie Dough
Nutritious cookie dough loaded with protein, easy to whip up and enjoy any time.
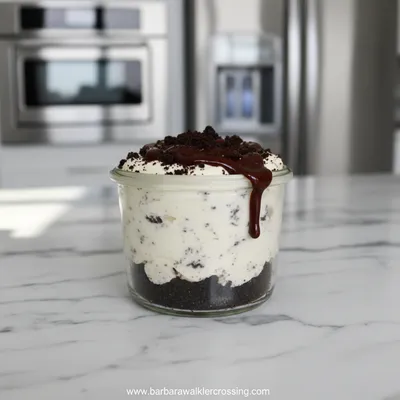
Oreo No-Bake Cheesecake Cups
These Oreo No-Bake Cheesecake Cups are creamy, buttery, and ready in minutes—perfect for a quick sweet treat. Pair them with oreo balls for extra crunch.
Timing
Prep Time
15 Minutes
Cook Time
0 Minutes
Total Time
2 Hours 15 Minutes
Recipe Details
Ingredients
Crust
-
01
24 Oreo cookies, finely crushed
-
02
2 tbsp melted butter
Filling
-
01
8 oz cream cheese, softened
-
02
1/3 cup powdered sugar
-
03
1 tsp vanilla extract
-
04
1 tbsp fresh lemon juice
-
05
1 cup whipped topping
Garnish
-
01
Extra crushed Oreo
-
02
Optional fresh berries
Instructions
Combine crushed Oreo cookies with melted butter; press the mixture into the bottom of each serving cup, forming an even layer.
In a mixing bowl, beat the softened cream cheese until smooth, then gradually add powdered sugar, vanilla, and lemon juice, mixing until creamy.
Fold the whipped topping gently into the cream cheese mixture, preserving the airy texture.
Spoon the filling over the crusts, smoothing the tops with a spatula.
Refrigerate the cups for at least 2 hours, or until set.
Before serving, sprinkle each cup with extra crushed Oreo and garnish with berries if desired.
Notes & Tips
-
1
For a richer flavor, add a pinch of sea salt to the crust.
-
2
If you prefer a firmer texture, chill overnight.
-
3
Feel free to swap whipped topping with a light mascarpone mousse.
Tools You'll Need
-
Food processor or zip‑top bag and rolling pin
-
Measuring cups and spoons
-
Mixing bowls
-
Hand mixer
-
Serving cups
-
Spatula
Must-Know Tips
-
Don’t over‑mix the filling; it stays light.
-
Press the crust firmly but not compacted.
-
Taste the filling before chilling; adjust sweetness if needed.
Professional Secrets
-
Room‑temperature cream cheese blends without lumps.
-
Chilling sets the crumb and prevents sogginess.
-
A brief whisk of lemon juice brightens the overall taste.

Recipe by
Barbara WalkerCooking with heart and heritage 🥘❤️ Sharing nostalgic flavors, family comfort, and timeless kitchen love ✨
Get Delicious Recipes Weekly
Join 25,000+ home cooks getting our best recipes straight to their inbox.
Free forever • No spam • Unsubscribe anytime