
Cheesecakes have traveled from ancient Greek islands to modern dessert tables, each culture adding its own twist. The mini version originated in Europe during the turn of the 20th century, when bakers sought a portable, elegant bite for high‑tea. Over time, the size grew popular in American bakeries, where the bite‑size charm fit perfectly into cup‑filled coffee rituals.
Why You'll Love It
-
- Easy to portion and serve without cutting
-
- The crust stays buttery and crisp even after chilling
-
- Creamy filling balances richness with a light tang
-
- Perfect for making ahead and storing
"These mini cheesecakes are pure comfort—soft, sweet, and just the right size for a quick smile."
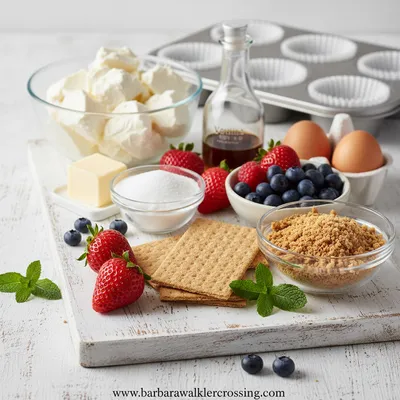
Essential Ingredient Guide
- Cream cheese: Choose full‑fat cream cheese for a smooth, rich base; allow it to soften at room temperature before mixing.
- Graham crackers: Crush finely and toast lightly for extra crunch; substitute with digestive biscuits for a subtle malt note.
- Sugar: Granulated sugar dissolves evenly, giving a gentle sweetness without overwhelming the cheese.
- Vanilla extract: A splash adds depth; use pure extract for the cleanest aroma.
- Lemon zest: Fresh zest lifts the flavor, providing a bright counterpoint to the creamy filling.
- Sour cream: Adds a silky texture and a faint tang that keeps the filling from feeling heavy.
Complete Cooking Process
-
Ingredient Readiness:
Soften cream cheese, crush crackers, and zest the lemon before you begin; this ensures a smooth batter and even crust.
-
Flavor Development:
Mixing the vanilla and zest into the filling lets the aromatic oils bloom, creating a fragrant base.
-
Texture Control:
Avoid over‑mixing the batter; gentle folds keep the filling airy and prevent a dense crumb.
-
Finishing Touches:
A dusting of powdered sugar or fresh berries adds visual charm just before serving.
-
Serving Timing:
Chill the cheesecakes for at least two hours; they hold their shape and flavor best when served cool.
-
Use a food processor for the crust to get an even crumb.
-
Tap the filled tins gently to release air bubbles.
-
Let the cheesecakes sit at room temperature 5 minutes before plating.
-
Top with a thin lemon glaze for extra shine.
Pro Tips
Well, I’ve found that these tiny treats taste even better after a short rest on the counter—just enough to let the flavors mingle without melting the crust. So, when you pull them out, give them a moment, then arrange them on a platter and watch how the guests’ eyes light up. It’s those small pauses that turn a simple dessert into a shared memory.
The essence of the dish:
At its heart, this mini cheesecake is a balance of buttery crumb and velvety cheese, with a whisper of lemon that brightens each bite.
A fun fact or historical angle:
Did you know that the smallest cheesecakes were originally served on silver trays in Edwardian tea rooms? high protein cheesecake jars see more echo that tradition with modern nutrition.
Flavor or sensory focus:
You’ll first notice the buttery scent of the crust, then the cool, creamy tang of the cheese, followed by a bright citrus finish. strawberry cheesecake overnight oats see more share that same comforting sweet‑tart harmony.
You Must Know
-
The crust should be firmly pressed for a uniform base.
-
Do not over‑bake; the center should still wobble slightly.
-
Cool the tins upside down to avoid cracks.
Frequently Asked Questions
→ Can I use a different crust?
Absolutely—almond flour or oatmeal crumbs work nicely, just add a dash more butter to bind.
→ How long can the mini cheesecakes be stored?
Refrigerate in an airtight container for up to 4 days; they stay smooth and flavorful.
→ Do I need a water bath?
No water bath is necessary; the mini size prevents cracking and cooks evenly.
→ Can I make them dairy‑free?
Swap cream cheese for a firm vegan cream cheese and use coconut oil in the crust.
→ What toppings work best?
Fresh berries, a drizzle of caramel, or a dusting of cocoa powder all complement the subtle tang.
→ Do they need to be chilled before serving?
Yes, at least two hours; chilling sets the filling and firms the crust for clean slices.
Nutrition Facts
per serving
210
Calories
5g
Protein
18g
Carbs
13g
Fat
Taste Profile
A balanced sweet‑tangy profile with buttery depth.
Ingredient Substitutions
Don't have an ingredient? Try these alternatives
Provides a dairy‑free base; add a splash of lemon juice for tang.
Swap one‑for‑one; they give a slightly maltier flavor.
Recipe Variations
Try these delicious twists on the original
Spicy Version
Add a pinch of cayenne and drizzle with honey for a subtle heat.
Mediterranean Style
Fold in crumbled feta and chopped olives, then top with sun‑dried tomatoes.
Common Mistakes to Avoid
Learn from others' mistakes for perfect results
- Over‑mixing the batter, leading to a dense texture.
- Baking too long, which cracks the top.
- Using cold cream cheese, resulting in lumps.
Meal Prep & Storage
Make Ahead Tips
You can prepare the crust a day ahead and keep it refrigerated; fill and bake the day you plan to serve for maximum freshness.
Leftover Ideas
Reheat gently in a skillet over low heat with a splash of milk to restore creaminess, or enjoy cold straight from the fridge.
Perfect Pairings
Serve this with...
Cooking Timeline
Prepare crust: crush crumbs, melt butter, combine, and press into tins.
Blend filling ingredients until just smooth; avoid over‑mixing.
Bake mini cheesecakes; watch for a slight wobble in the center.
Cool in pan, then chill in refrigerator; add toppings before serving.

Mini Cheesecakes Recipe
Bite‑size mini cheesecakes that melt in your mouth, with a buttery graham‑crust and a silky sweet filling—perfect for tea time, parties, or a quiet moment of indulgence.
Timing
Prep Time
20 Minutes
Cook Time
15 Minutes
Total Time
35 Minutes
Recipe Details
Ingredients
For the Crust
-
01
1 1/2 cups graham cracker crumbs
-
02
3 tbsp melted butter
-
03
2 tbsp sugar
For the Filling
-
01
12 oz full‑fat cream cheese, softened
-
02
1/2 cup sour cream
-
03
1/3 cup granulated sugar
-
04
2 large eggs
-
05
1 tsp vanilla extract
-
06
Zest of 1 lemon
-
07
2 tbsp heavy cream
For the Topping
-
01
Fresh berries or fruit compote
-
02
Powdered sugar for dusting
Instructions
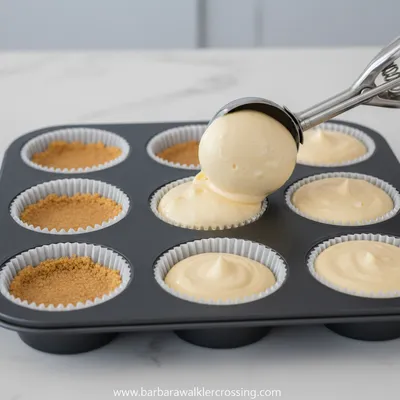
Preheat the oven to 325°F (163°C). Combine graham crumbs, melted butter, and sugar; press the mixture into the bottoms of a 12‑cup muffin tin.
Beat the softened cream cheese until smooth, then add sour cream, sugar, and lemon zest; mix gently.
Incorporate eggs one at a time, followed by vanilla and heavy cream; avoid over‑mixing to keep the texture light.
Pour the filling over the crusts, filling each cup just below the rim. Bake for 12‑15 minutes, until the centers are set but still have a slight wobble.
Allow the cheesecakes to cool in the pan for 10 minutes, then transfer to the refrigerator and chill for at least two hours.
Top with fresh berries, a light dusting of powdered sugar, and serve chilled.
Notes & Tips
-
1
Do not over‑bake; the center should remain just barely jiggly.
-
2
If you prefer a firmer texture, add a tablespoon of flour to the filling.
-
3
For a seasonal twist, swirl in pumpkin puree and garnish with a sprinkle of cinnamon.
 Baking, Bread & Sweet Comforts
High Protein Cookie Dough
Nutritious cookie dough loaded with protein, easy to whip up and enjoy any time.
Tools You'll Need
-
Muffin tin or mini cheesecake pan
-
Food processor or zip‑top bag for crushing crumbs
-
Hand mixer or stand mixer
-
Spatula
-
Measuring cups and spoons
-
Cooling rack
Must-Know Tips
-
Don’t over‑mix the batter; gentle folds keep it airy.
-
Press the crust firmly to avoid gaps.
-
Cool the tins upside down to prevent cracking.
Professional Secrets
-
Room temperature cream cheese ensures a lump‑free batter.
-
A brief rest after baking helps the filling set evenly.
-
Use a silicone muffin pan for easy release.

Recipe by
Barbara WalkerCooking with heart and heritage 🥘❤️ Sharing nostalgic flavors, family comfort, and timeless kitchen love ✨
Get Delicious Recipes Weekly
Join 25,000+ home cooks getting our best recipes straight to their inbox.
Free forever • No spam • Unsubscribe anytime