
Cheesecake has traced its lineage back to ancient Greece, where farmers mixed cheese with honey for a simple dessert. Over centuries, the dish traveled through Europe, evolving into the rich, buttery classic we know today. The modern, single‑serve jar format is a recent invention, catering to busy lives that still crave comfort. By pairing whey protein with traditional cream cheese, this version honors the heritage while meeting today’s nutritional needs.
Why You'll Love It
-
- Creamy texture that melts on the tongue
-
- Packed with protein to keep you satisfied
-
- Easy to portion and store for on‑the‑go snacking
-
- Simple ingredients you likely have on hand
"I never thought a jar could feel this luxurious and still keep my macros in check!"
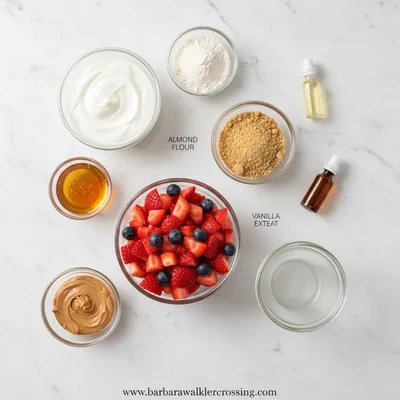
Essential Ingredient Guide
- Cream cheese: Choose full‑fat for richness; let it soften to room temperature before mixing.
- Whey protein isolate: A vanilla‑flavored isolate blends seamlessly and adds a sweet undertone.
- Greek yogurt: Adds tang and a lighter mouthfeel while boosting protein.
- Honey or maple syrup: A drizzle balances the tang of the cheese; adjust to taste.
- Lemon juice: A splash brightens the filling and cuts richness.
- Fresh berries: Use berries for a burst of color and natural sweetness.

Complete Cooking Process
-
Ingredient Readiness:
Soften cream cheese, measure protein powder, and prep the crust ingredients; this ensures a smooth blend.
-
Flavor Development:
Mix the filling slowly, allowing the protein powder to dissolve fully, then fold in yogurt and zest.
-
Texture Control:
Press the crust into jars, chill briefly; this prevents sogginess when the filling is added.
-
Finishing Touches:
Top each jar with a swirl of honey and a scattering of berries just before serving.
-
Serving Timing:
Serve chilled, but let the jar sit at room temperature for five minutes for optimal creaminess.
-
Use a food processor for an ultra‑smooth crust.
-
Add a pinch of sea salt to heighten sweetness.
-
Swirl the honey with a toothpick for a marble effect.
-
Store jars in the fridge for up to three days; they stay fresh.
Pro Tips
Well, the little details make a big difference. I find that letting the crust set in the freezer for ten minutes before adding the filling gives it extra sturdiness. And if you’re feeling adventurous, a dusting of edible gold leaf can turn these jars into a tiny celebration. The process is simple, yet the result feels like a bite of something special.
 Baking, Bread & Sweet Comforts
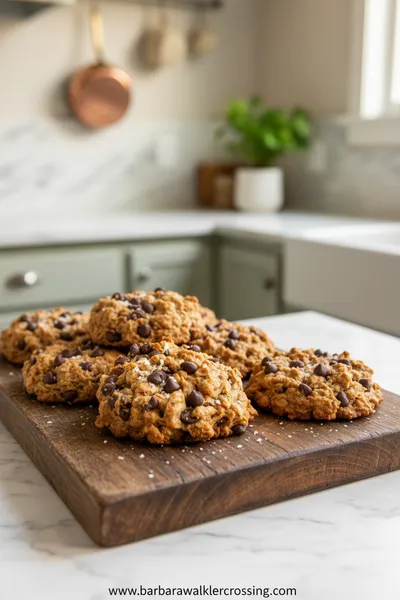
High Protein Cookie Dough
Nutritious cookie dough loaded with protein, easy to whip up and enjoy any time.
The essence of the dish:
A balance of tangy cream cheese, sweet protein, and a buttery crust creates a dessert that feels indulgent yet purposeful.
A fun fact or historical angle:
Cheesecake was once considered a health food in medieval Europe, prized for its nourishing qualities.
Flavor or sensory focus:
Expect a silky mouthfeel, a faint citrus lift, and the gentle snap of a crisp crust.
You Must Know
-
Keep the filling chilled before serving
-
Do not over‑mix; air bubbles can dry out the texture
-
Taste and adjust sweetness after the protein powder is dissolved
Frequently Asked Questions
→ Can I use a different protein flavor?
Absolutely. Vanilla works best, but chocolate or strawberry can be swapped in; just adjust the sweetener accordingly.
→ How long can the jars be stored?
Keep them refrigerated in a sealed container for up to three days; the crust stays crisp if chilled well.
→ Do I need a springform pan?
No, individual mason jars or small glass jars work perfectly and simplify portion control.
→ Can I make them dairy‑free?
Replace cream cheese with a plant‑based alternative and use coconut‑based yogurt; choose a pea‑protein isolate.
→ What toppings work best?
Fresh berries, a drizzle of honey, toasted almond slivers, or a light dusting of cocoa powder all complement the flavor.
→ Is the crust essential?
The crust adds texture, but you can forgo it for a simple protein‑filled parfait if you prefer.
Nutrition Facts
per serving
280
Calories
20g
Protein
22g
Carbs
12g
Fat
Taste Profile
Creamy with a gentle sweet tang
Ingredient Substitutions
Don't have an ingredient? Try these alternatives
Neufchatel is lower in fat but maintains a similar texture.
Maple adds a subtle caramel flavor; use the same amount.
Recipe Variations
Try these delicious twists on the original
Chocolate Swirl
Add 2 tbsp cocoa powder to the filling and swirl with a knife before chilling.
Citrus Zest
Incorporate orange or lime zest into the crust for a bright, aromatic note.
Common Mistakes to Avoid
Learn from others' mistakes for perfect results
- Over‑mixing the filling, which can introduce air bubbles.
- Using cold cream cheese, leading to a lumpy texture.
- Skipping the chilling step, resulting in a runny center.
Meal Prep & Storage
Make Ahead Tips
Prepare the crust and fill the jars up to the filling stage; cover and refrigerate up to 24 hours before adding the fresh berry topping.
Leftover Ideas
Reheat gently in the microwave for 15 seconds if you prefer a warmer texture, but the cheesecake is delightful chilled.
Perfect Pairings
Serve this with...
Cooking Timeline
Gather and measure all ingredients; pre‑soften cream cheese.
Blend crust ingredients and press into jars.
Mix filling ingredients until smooth, then spoon into jars.
Chill jars in the refrigerator to set the filling.
Add fresh berries and honey drizzle just before serving.
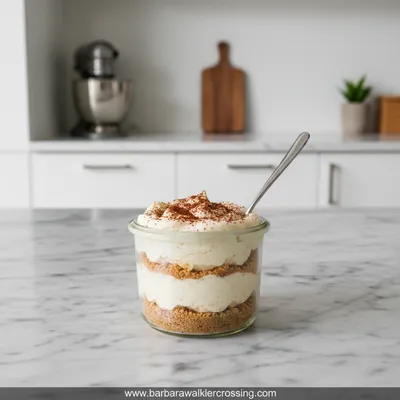
High Protein Cheesecake Jars
Enjoy creamy high protein cheesecake jars, a guilt‑free dessert packed with protein and flavor, perfect for a quick sweet bite. These portable jars combine velvety cheese, a hint of vanilla, and a boost of whey protein, all nestled in a buttery crust that stays crisp.
Timing
Prep Time
15 Minutes
Cook Time
0 Minutes
Total Time
15 Minutes
Recipe Details
Ingredients
Crust
-
01
1 cup graham cracker crumbs
-
02
2 tbsp melted butter
-
03
1 tbsp honey
-
04
1 tsp cinnamon
Filling
-
01
8 oz cream cheese, softened
-
02
1 cup Greek yogurt
-
03
1 scoop vanilla whey protein isolate
-
04
2 tbsp honey or maple syrup
-
05
1 tbsp lemon juice
-
06
1 tsp vanilla extract
-
07
Pinch of sea salt
Topping
-
01
Fresh mixed berries (strawberries, blueberries, raspberries)
-
02
Additional honey drizzle
Instructions
Combine graham cracker crumbs, melted butter, honey, and cinnamon; press the mixture firmly into the bottom of each jar.
In a bowl, beat cream cheese until smooth, then fold in Greek yogurt, protein powder, honey, lemon juice, vanilla, and sea salt until fully incorporated.
Spoon the filling over the crust in each jar, smoothing the top with the back of a spoon.
Refrigerate the jars for at least 30 minutes to set; before serving, add fresh berries and a drizzle of honey.
Enjoy straight from the jar, or transfer to a plate if you prefer.
Notes & Tips
-
1
For a firmer texture, chill the crust for 10 minutes before adding the filling.
-
2
If the filling feels too thick, stir in a tablespoon of milk or almond milk.
-
3
Feel free to substitute the berries with sliced kiwi or mango for a tropical twist.
Tools You'll Need
-
Mason jars or small glass jars
-
Mixing bowl
-
Hand mixer or whisk
-
Measuring cups and spoons
-
Small spatula
-
Food processor (optional for crust)
Must-Know Tips
-
Don’t over‑beat the cream cheese; it can become grainy.
-
Press the crust firmly to avoid crumbling.
-
Taste the filling before chilling; adjust sweetness if needed.
Professional Secrets
-
Room temperature cream cheese blends without lumps.
-
A pinch of salt amplifies the sweet notes.
-
Chilling the crust first locks in crispness.

Recipe by
Barbara WalkerCooking with heart and heritage 🥘❤️ Sharing nostalgic flavors, family comfort, and timeless kitchen love ✨
Get Delicious Recipes Weekly
Join 25,000+ home cooks getting our best recipes straight to their inbox.
Free forever • No spam • Unsubscribe anytime