
Vanilla ice cream traces its roots back to the early 18th century when a French chef first blended cream, sugar, and vanilla pods into a frozen delight for aristocratic tables. The technique evolved with the invention of hand‑cranked ice‑cream makers, but the essence—sweet, fragrant, and smooth—remains unchanged. This no‑cook version honors that tradition by using an ice‑water bath to freeze the custard without heat, keeping the vanilla’s bright aroma intact. It’s a simple nod to culinary history, perfect for modern kitchens.
Why You'll Love It
-
- No stove required, perfect for hot days
-
- Simple pantry ingredients, no fancy tools
-
- Creamy texture that rivals commercial brands
-
- Subtle vanilla flavor that feels home‑grown
"This no‑cook vanilla ice cream is a game‑changer—smooth, fragrant, and effortless!"
Essential Ingredient Guide
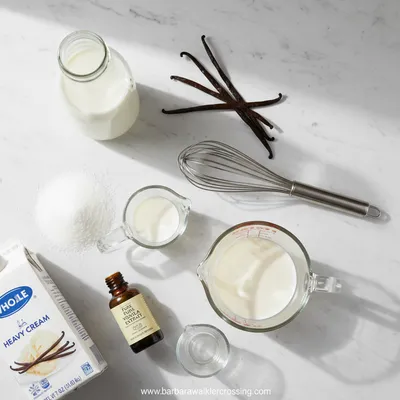
- Heavy cream: Provides richness; choose a brand with at least 35% fat for silkiness.
- Whole milk: Balances the cream; fresh, cold milk helps the mixture freeze evenly.
- Granulated sugar: Dissolves fully for a smooth mouthfeel; you can adjust to taste.
- Vanilla bean or pure extract: The star of the show; split the bean and scrape the seeds for depth.
- Salt: A pinch enhances the vanilla’s sweetness and balances flavors.
- Optional honey drizzle: Adds a floral hint if you like a touch of extra sweetness.
Complete Cooking Process
-
Ingredient Readiness:
Measure and chill all dairy components; split the vanilla bean and scrape the seeds into the bowl.
-
Flavor Development:
Whisk sugar, salt, and vanilla into the milk‑cream blend until the sugar disappears, then set the mixture in the ice‑water bath.
-
Texture Control:
Stir gently every 20‑30 minutes as the edges begin to freeze, preventing ice crystals.
-
Finishing Touches:
When the mixture is thick but still soft, transfer to a container and smooth the top.
-
Serving Timing:
Let the ice cream sit a few minutes at room temperature before scooping for a perfect glide.
-
Use a metal bowl for the ice bath; it conducts cold faster.
-
Add a splash of vanilla extract if the bean is shy.
-
Cover the container tightly to avoid freezer burn.
Pro Tips
Well, after you follow these little tricks, the ice cream will hold its creamy texture longer. Ugh, I’ve learned that a loose lid invites ice crystals—so seal it well. Look, the next time you make this treat, you’ll notice the difference in every bite.
The essence of the dish:
It’s the gentle sweetness of vanilla paired with the silk of cream that makes this dessert feel like a quiet hug.
A fun fact or historical angle:
Did you know the first recorded vanilla ice cream was served in Paris in 1686? The flavor has traveled across continents, landing on humble kitchen tables.
Flavor or sensory focus:
When you scoop it, you’ll first notice the cool, creamy body, then the lingering perfume of vanilla that stays on the palate.
You Must Know
-
Keep the mixture cold throughout
-
Stir at regular intervals
-
Seal tightly to prevent ice crystals
Frequently Asked Questions
→ Can I use almond milk instead of dairy?
Yes, but the texture will be lighter and less creamy. You may add a tablespoon of coconut cream to boost richness.
→ How long can the ice cream be stored?
It stays best for up to two weeks in an airtight container, though texture may firm up a bit.
→ Do I need an ice‑cream maker?
No, the ice‑water bath does the job; just stir regularly as it freezes.
→ Can I add mix‑ins like chocolate chips?
Fold in mix‑ins after the base is thick but still soft, then refreeze for a few more minutes.
→ Is fresh vanilla better than extract?
Fresh beans give a deeper, more fragrant flavor, but high‑quality extract works well too.
→ What if the ice cream becomes grainy?
Stir more often during freezing to break up ice crystals, and ensure the bowl is very cold.
Nutrition Facts
per serving
280
Calories
3g
Protein
22g
Carbs
20g
Fat
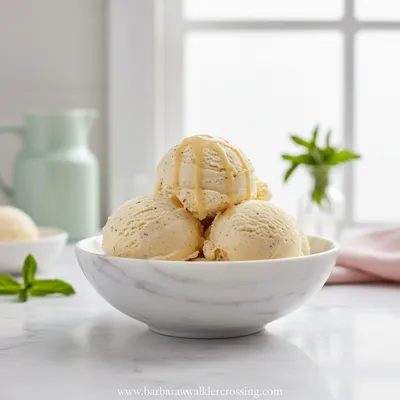
Taste Profile
Classic vanilla sweetness with a buttery finish
Ingredient Substitutions
Don't have an ingredient? Try these alternatives
Provides similar richness but adds a subtle coconut flavor.
Use slightly less syrup; it adds a mellow caramel note.
Recipe Variations
Try these delicious twists on the original
Spicy Version
Add a pinch of cinnamon and a dash of cardamom for a warm, aromatic twist.
Mediterranean Style
Stir in crumbled feta and toasted pine nuts after the base thickens for a savory‑sweet contrast.
Common Mistakes to Avoid
Learn from others' mistakes for perfect results
- Skipping the regular stirring, leading to gritty ice crystals.
- Using a warm bowl for the ice bath, which slows freezing.
- Not covering the container tightly, causing freezer burn.
Meal Prep & Storage
Make Ahead Tips
You can whisk the base and chill it in the refrigerator for up to 24 hours before starting the ice‑water bath. This deepens the vanilla flavor.
Leftover Ideas
Scoop a serving into a saucepan, warm gently over low heat, and stir until smooth for a quick vanilla sauce.
Perfect Pairings
Serve this with...
Cooking Timeline
Combine all ingredients and whisk until sugar dissolves.
Place bowl in ice‑water bath, stirring every 20‑30 minutes.
Fold in optional honey swirl and transfer to freezer container.
Freeze for at least 1 hour; stir gently before serving.

Vanilla Ice Cream – No‑Cook Homemade Recipe
Enjoy a silky vanilla ice cream made without ever turning on the stove. This no‑cook method uses simple pantry staples and a trusty ice‑water bath, delivering a creamy treat that feels like a quiet moment on a warm afternoon. Look, the texture stays smooth, the vanilla scent lingers gently, and you don’t need fancy equipment—just a little patience and love.
Timing
Prep Time
15 Minutes
Cook Time
0 Minutes
Total Time
4 Hours
Recipe Details
Ingredients
Base
-
01
2 cups heavy cream
-
02
1 cup whole milk
-
03
½ cup granulated sugar
-
04
1 vanilla bean (or 2 tsp pure vanilla extract)
-
05
¼ tsp salt
Optional Swirl
-
01
2 tbsp honey
-
02
1 tsp vanilla extract
Instructions
Split the vanilla bean lengthwise, scrape the seeds into a large mixing bowl, and add the vanilla extract if using.
Pour the cream, milk, sugar, and salt over the vanilla; whisk until the sugar dissolves and the mixture looks slightly glossy.
Place the bowl in a larger container filled with ice and water, stirring gently every 20‑30 minutes for about 3‑4 hours, until thickened.
If adding a swirl, gently fold honey and extra vanilla into the semi‑frozen base, then transfer everything to a freezer‑safe container and smooth the top.
Cover tightly and freeze for at least 1 hour before serving; let sit a few minutes at room temperature to scoop easily.
Notes & Tips
-
1
Make sure the ice bath stays cold; add salt to the water if needed.
-
2
For a richer flavor, let the mixture rest in the fridge for 30 minutes before freezing.
-
3
You can experiment with a dash of almond extract for a subtle twist.
 Baking, Bread & Sweet Comforts
High Protein Cookie Dough
Nutritious cookie dough loaded with protein, easy to whip up and enjoy any time.
Tools You'll Need
-
Large mixing bowl
-
Whisk
-
Ice‑water bath container
-
Freezer‑safe loaf pan or container
-
Spatula
Must-Know Tips
-
Don’t skip the stirring intervals, it prevents icy crystals.
-
Seal the container tightly to keep out freezer burn.
-
A pinch of salt amplifies vanilla’s sweetness.
Professional Secrets
-
Use a metal bowl for the ice bath; it chills faster than glass.
-
Chill the cream and milk beforehand for smoother freezing.
-
Fold in any add‑ins after the base has thickened but is still soft.

Recipe by
Barbara WalkerCooking with heart and heritage 🥘❤️ Sharing nostalgic flavors, family comfort, and timeless kitchen love ✨
Get Delicious Recipes Weekly
Join 25,000+ home cooks getting our best recipes straight to their inbox.
Free forever • No spam • Unsubscribe anytime