
Spinach and ricotta stuffed shells trace their roots to the humble farmhouses of Italy, where abundance of garden greens and fresh cheese made for simple, satisfying meals. The dish evolved as families layered pasta with what was on hand, creating a baked masterpiece that traveled from village tables to modern homes. Its popularity endures because the combination of tender greens and rich cheese speaks to a universal love of comfort food.
Why You'll Love It
-
- Warm, comforting flavors that remind you of home
-
- Simple steps that fit into a busy week
-
- Veggie‑forward dish that still feels indulgent
-
- Easy to customize with your favorite herbs
"The shells melted in my mouth, and the ricotta was so fluffy—my kids asked for seconds!"
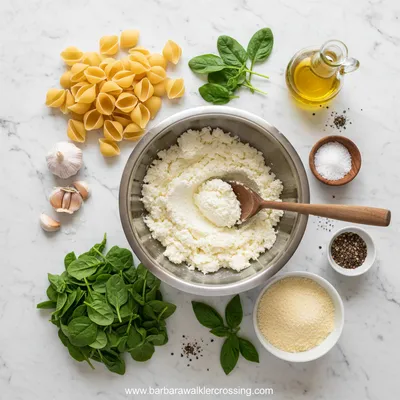
Essential Ingredient Guide
- Fresh spinach: Choose dark green leaves; they hold a mild earthiness and add a pleasant texture when wilted.
- Ricotta cheese: Look for a creamy, slightly grainy ricotta; it blends beautifully with the spinach and creates a light filling.
- Large pasta shells: A sturdy shell prevents spilling and offers a perfect pocket for the filling.
- Garlic and nutmeg: A pinch of garlic awakens the palate, while a whisper of nutmeg deepens the buttery note.
- Parmesan and mozzarella: Parmesan adds a sharp bite, mozzarella provides melt and stretch on top.
- Olive oil: Use a good extra‑virgin olive oil to coat the shells before baking; it adds subtle fruitiness.
Complete Cooking Process
-
Ingredient Readiness:
Wash and dry the spinach, drain the ricotta, and cook the shells just shy of al dente so they finish in the oven.
-
Flavor Development:
Sauté garlic in olive oil, then fold in spinach until wilted; this builds the aromatic base for the filling.
-
Texture Control:
Combine the ricotta, Parmesan, and a dash of nutmeg, then gently fold in the spinach mixture to keep the filling light.
-
Finishing Touches:
Top the assembled shells with mozzarella and a drizzle of olive oil before the final bake, letting the cheese turn golden.
-
Serving Timing:
Let the casserole rest a few minutes after it comes out of the oven; this allows the sauce to settle and the shells to hold their shape.
-
Don’t over‑cook the pasta; it will continue to soften in the sauce.
-
Season the ricotta mixture with a pinch of salt and pepper to avoid blandness.
-
Add a splash of milk if the filling feels too thick; it loosens the texture.
-
Cover with foil for the first 20 minutes, then uncover to brown the cheese.
Pro Tips
Well, these little adjustments make a world of difference. I remember once leaving the foil on too long and the cheese stayed pale—oops! A quick uncover gave it that lovely caramel edge. So, keep an eye on the timer and enjoy the gentle aroma that fills the kitchen as the shells bake.
The essence of the dish:
At its heart, this recipe is about balance—the earthy spinach meets the sweet, airy ricotta, all wrapped in a tender pasta shell that soaks up a modest tomato‑based sauce.
A fun fact or historical angle:
In the early 1900s, Italian families would layer leftover pasta with cheese and greens, creating a baked dish that stretched meals further. That tradition lives on in today’s stuffed shells.
Flavor or sensory focus:
When you bite in, the first thing you notice is the buttery melt of mozzarella, followed by the herb‑kissed ricotta and a whisper of nutmeg that reminds you of a cozy kitchen.
You Must Know
-
Use fresh spinach for the best color and taste
-
Don’t over‑mix the filling; keep it airy
-
A pinch of nutmeg elevates the cheese
Frequently Asked Questions
→ Can I make this ahead of time?
Yes, assemble the shells, cover, and refrigerate up to 24 hours before baking. The flavors will meld beautifully.
→ What can I use instead of ricotta?
Cottage cheese blended until smooth works well, or use a mixture of cream cheese and yogurt for extra tang.
→ Do I need tomato sauce?
A light marinara adds moisture and flavor, but you can skip it for a purely cheesy bake.
→ How do I keep the shells from sticking together?
Toss the cooked shells lightly with olive oil before filling; this creates a thin protective coating.
→ Can I freeze leftovers?
Absolutely. Cool completely, wrap tightly, and freeze for up to two months. Reheat in the oven for best texture.
→ Is this recipe gluten‑free?
Swap regular pasta shells for gluten‑free versions and use a gluten‑free tomato sauce to keep it safe.
Nutrition Facts
per serving
420
Calories
22g
Protein
45g
Carbs
18g
Fat
Taste Profile
Savory with a hint of sweet cheese richness
Ingredient Substitutions
Don't have an ingredient? Try these alternatives
Blend until smooth to mimic ricotta's texture.
Puree fresh tomatoes with basil for a fresher taste.
Recipe Variations
Try these delicious twists on the original
Spicy Version
Add ½ tsp crushed red pepper flakes to the sauce and a dash of hot sauce for a gentle kick.
Mediterranean Style
Stir in chopped sun‑dried tomatoes and Kalamata olives into the filling, and finish with crumbled feta.
Common Mistakes to Avoid
Learn from others' mistakes for perfect results
- Over‑cooking the pasta, leading to mushy shells.
- Skipping the seasoning in the ricotta mixture, resulting in bland filling.
- Leaving the foil on too long, preventing cheese browning.
Meal Prep & Storage
Make Ahead Tips
You can assemble the stuffed shells and cover them tightly, then refrigerate up to 24 hours before baking. This lets the flavors meld.
Leftover Ideas
Reheat gently in a covered skillet with a splash of sauce, or warm in the oven at 300°F for 15 minutes.
Perfect Pairings
Serve this with...
Cooking Timeline
Preheat oven, bring water to boil, and start cooking shells.
Sauté garlic, add spinach, and season.
Mix ricotta, Parmesan, nutmeg, and spinach mixture.
Assemble shells in the dish, add sauce and cheeses.
Bake covered then uncovered until cheese is golden.

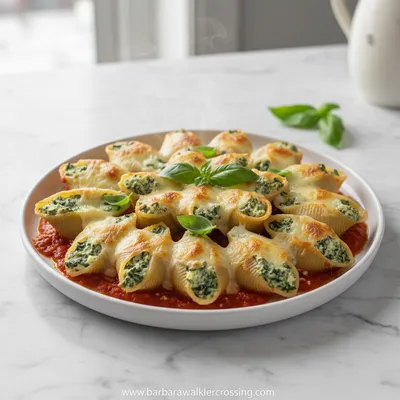
Spinach and Ricotta Stuffed Shells
A comforting bake where tender pasta shells cradle a silky mixture of spinach and ricotta, topped with melted mozzarella. The dish feels like a warm hug on a cool evening, with the gentle scent of garlic and fresh herbs filling the kitchen. Perfect for a family dinner that feels both simple and special.
Timing
Prep Time
20 Minutes
Cook Time
35 Minutes
Total Time
55 Minutes
Recipe Details
Ingredients
Main Ingredients
-
01
12 large pasta shells
-
02
4 cups fresh spinach, chopped
-
03
1 ½ cups ricotta cheese
-
04
1 cup shredded mozzarella
-
05
½ cup grated Parmesan
-
06
2 cloves garlic, minced
-
07
2 tbsp olive oil
-
08
¼ tsp ground nutmeg
-
09
Salt and pepper to taste
Sauce
-
01
2 cups marinara sauce
-
02
1 tsp dried oregano
-
03
1 tsp dried basil
Instructions
Preheat the oven to 375°F (190°C). Cook the shells in salted boiling water until just al dente, about 7 minutes; drain and set aside.
In a skillet, warm olive oil over medium heat, add garlic and sauté until fragrant, then stir in the spinach and cook until wilted, about 3 minutes. Season with salt, pepper, and nutmeg.
In a mixing bowl, combine ricotta, half of the Parmesan, and the cooked spinach mixture. Mix gently until just blended.
Spread a thin layer of marinara sauce in a 9‑x‑13‑inch baking dish. Fill each shell with the ricotta‑spinach mixture and place them seam‑side up in the dish.
Pour the remaining marinara over the shells, sprinkle with oregano, basil, the mozzarella, and the remaining Parmesan. Cover with foil and bake for 20 minutes, then remove foil and bake another 10‑12 minutes until the cheese is golden.
Notes & Tips
-
1
Allow the dish to rest 5 minutes before serving to let the sauce settle.
-
2
If you prefer a spicier flavor, add a pinch of red pepper flakes to the sauce.
-
3
For extra richness, drizzle a little extra‑virgin olive oil over the top just before serving.
Tools You'll Need
-
Large pot
-
Skillet
-
Mixing bowl
-
9‑x‑13‑inch baking dish
-
Aluminum foil
-
Wooden spoon
Must-Know Tips
-
Don’t over‑cook the shells; they will finish in the oven
-
Season the ricotta mixture well to avoid blandness
-
Cover with foil first to melt cheese evenly
-
Let the casserole rest before cutting
Professional Secrets
-
Use slightly chilled ricotta; it holds its shape better when mixed
-
A splash of milk in the filling keeps it moist
-
Broil for the last 2 minutes for a beautifully browned top

Recipe by
Isabella MooreCelebrating life with flavor 🎉🍽️ Creating magical seasonal dishes full of warmth, joy, and delicious taste ✨
Get Delicious Recipes Weekly
Join 25,000+ home cooks getting our best recipes straight to their inbox.
Free forever • No spam • Unsubscribe anytime