
The s'more, a beloved treat that emerged in the early 20th century United States, quickly became a staple of camping culture. Its simple combination of graham cracker, chocolate, and marshmallow captured the imagination of generations seeking sweet comfort around a fire. This bar adapts that tradition into a home kitchen, preserving the nostalgic flavor while offering a convenient, sliceable form.
Why You'll Love It
-
- No need for a fire, just an oven
-
- Easy to slice and share
-
- Gooey marshmallow center every bite
-
- Perfect balance of chocolate and graham
-
- Great for picnics or cozy nights
"These bars taste like a hug from the campfire—sweet, buttery, and perfectly gooey!"
Essential Ingredient Guide
- Graham cracker crumbs: Provides a slightly sweet, buttery base; toast lightly for extra depth.
- Chocolate chips: Choose semi-sweet for a smooth melt; the richer the chocolate, the richer the bar.
- Mini marshmallows: Adds that iconic fluffy sweetness; ensure they’re evenly scattered for consistent goo.
- Butter: Melted butter binds the crust; use unsalted for better flavor control.
- Brown sugar: A hint of caramel notes enhances the smoky vibe.
- Vanilla extract: A whisper of vanilla lifts the overall sweetness without overwhelming.

Complete Cooking Process
-
Ingredient Readiness:
Measure and toast the graham crumbs, melt butter, and line your pan – everything should be at room temperature.
-
Flavor Development:
Combine crust ingredients, press firmly, then bake just until set; this creates a sturdy foundation for the gooey top.
-
Texture Control:
Add chocolate and marshmallows, baking just until the chocolate melts and marshmallows puff; avoid over‑baking to keep the center soft.
-
Finishing Touches:
Cool slightly, then slice with a warm knife for clean edges; a drizzle of extra chocolate adds shine.
-
Serving Timing:
Serve warm for melty bliss or at room temperature for a firmer bite – both are delightful.
-
Use a parchment-lined pan for easy removal
-
Press the crust down firmly for uniform bars
-
Add a pinch of sea salt on top to accent the chocolate
Pro Tips
Well, those little details make a world of difference. I remember one winter when the crust fell apart because I didn’t press it enough – oops! Take your time, feel the texture, and trust that gentle pressure. The result? Bars that hold together beautifully, letting you enjoy each buttery, chocolatey bite without a crumble in sight.
The essence of the dish:
It captures the smoky sweetness of a campfire in a handheld form, with a crisp graham base, molten chocolate, and fluffy marshmallow clouds.
A fun fact or historical angle:
The first commercial graham crackers were made in 1898, and by the 1920s, they became the go‑to partner for chocolate and marshmallows.
Flavor or sensory focus:
Expect the warm aroma of toasted sugar, the glossy melt of chocolate, and the soft, sweet stretch of marshmallow as you bite.
You Must Know
-
Cool the bars before slicing for cleaner cuts
-
Store in an airtight container to retain softness
-
Reheat gently for extra gooeyness
Frequently Asked Questions
→ Can I use gluten‑free graham crackers?
Yes, substitute with certified gluten‑free graham crackers or crushed gluten‑free cookies for a similar texture.
→ How do I keep the bars from getting soggy?
Allow the bars to cool completely on a wire rack before storing; keep them in a dry, airtight container.
→ Can I add nuts for extra crunch?
Absolutely – toasted pecans or walnuts add a lovely contrast to the soft center.
→ What if I don’t have mini marshmallows?
Use regular marshmallows cut into small pieces; they’ll melt just as nicely.
→ Is it possible to make these without an oven?
Yes, you can press the crust in a skillet, melt the chocolate on low heat, and finish under a broiler for a minute.
→ How long will leftovers stay fresh?
Stored properly, they stay soft and flavorful for up to four days.
Nutrition Facts
per serving
210
Calories
2g
Protein
24g
Carbs
12g
Fat
Taste Profile
A sweet, chocolate‑rich treat with a hint of toasted graham.
Ingredient Substitutions
Don't have an ingredient? Try these alternatives
Provides a richer flavor; melt carefully.
Creates a slight coconut note; keep the crust firm.
Recipe Variations
Try these delicious twists on the original
Spicy Version
Add a pinch of cayenne and a drizzle of caramel for a subtle heat.
Mediterranean Style
Mix toasted pine nuts into the crust and finish with a drizzle of honey.
Common Mistakes to Avoid
Learn from others' mistakes for perfect results
- Over‑baking the crust, leading to a hard base
- Skipping the press step, which causes uneven bars
- Adding marshmallows too early, causing them to burn
Meal Prep & Storage
Make Ahead Tips
Press the crust and bake; store cooled. Add chocolate and marshmallows later and bake fresh before serving.
Leftover Ideas
Reheat gently in a skillet over low heat, covering to retain moisture.
Perfect Pairings
Serve this with...
Cooking Timeline
Preheat oven and prepare pan; toast graham crumbs.
Mix crust ingredients, press, and bake first layer.
Add chocolate chips and marshmallows, return to oven.
Cool slightly, slice, and serve warm.

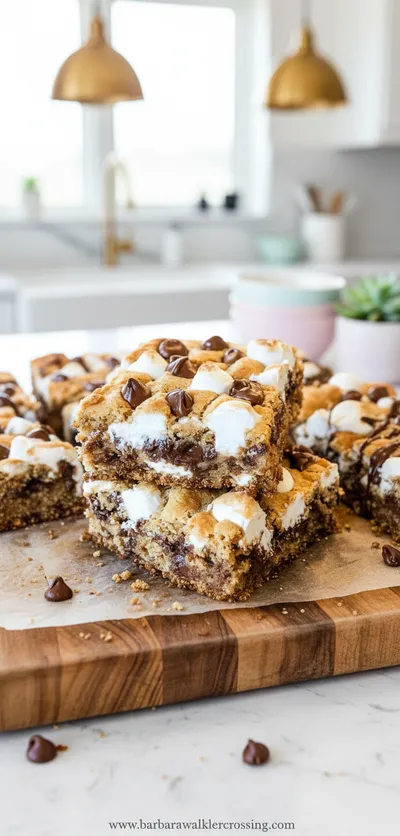
Smores Cookie Bars
Deliciously gooey smores cookie bars that bring campfire nostalgia to a convenient, handheld treat for any sweet craving.
Timing
Prep Time
15 Minutes
Cook Time
20 Minutes
Total Time
35 Minutes
Recipe Details
Ingredients
Crust
-
01
1 1/2 cups graham cracker crumbs
-
02
1/4 cup brown sugar
-
03
1/2 cup unsalted butter, melted
Topping
-
01
1 cup semi‑sweet chocolate chips
-
02
1 1/2 cups mini marshmallows
-
03
1 tsp vanilla extract
-
04
Pinch of sea salt
Instructions
Preheat the oven to 350°F (175°C). Line a 9x13‑inch pan with parchment.
In a bowl, mix graham crumbs, brown sugar, and melted butter until the mixture resembles wet sand.
Press the crumb mixture evenly into the prepared pan; bake for 8‑10 minutes until just set.
Remove the crust, sprinkle chocolate chips over the warm base, then scatter mini marshmallows on top.
Return to the oven for another 5‑7 minutes, just until the chocolate melts and marshmallows puff.
Let cool for 10 minutes, drizzle any extra melted chocolate if desired, then slice into bars.
Notes & Tips
-
1
If you like extra gooeyness, add a second layer of marshmallows after the first bake.
-
2
For a toasted flavor, lightly brown the graham crumbs in a dry pan before mixing.
-
3
A dash of espresso powder intensifies the chocolate without adding coffee flavor.

Tools You'll Need
-
9x13‑inch baking pan
-
Parchment paper
-
Mixing bowl
-
Spatula
-
Measuring cups
-
Sharp knife
Must-Know Tips
-
Don’t over‑bake; the bars stay soft when the marshmallows are just lightly puffed
-
Press the crust firmly for even layers
-
Cool slightly before cutting to avoid crumbling
Professional Secrets
-
Room temperature butter creates a cohesive crust
-
Low heat melt the chocolate to avoid burning
-
A quick broil at the end adds a caramelized top

Recipe by
Barbara WalkerCooking with heart and heritage 🥘❤️ Sharing nostalgic flavors, family comfort, and timeless kitchen love ✨
Get Delicious Recipes Weekly
Join 25,000+ home cooks getting our best recipes straight to their inbox.
Free forever • No spam • Unsubscribe anytime