
Cheesecake has roots stretching back to ancient Greece, where simple cheese and honey formed a modest dessert. Over centuries, the recipe evolved across continents, gaining cream cheese as a staple in the United States. This modern mini protein take builds on that heritage, using whey protein to boost nutrition while keeping the texture airy and smooth.
Why You'll Love It
-
- High‑protein, low‑sugar comfort
-
- Gluten‑free crumb base
-
- Easy to make ahead and freeze
-
- Perfect for portion control
"These mini cheesecakes are my new go‑to snack after a morning run—delicious and filling!"
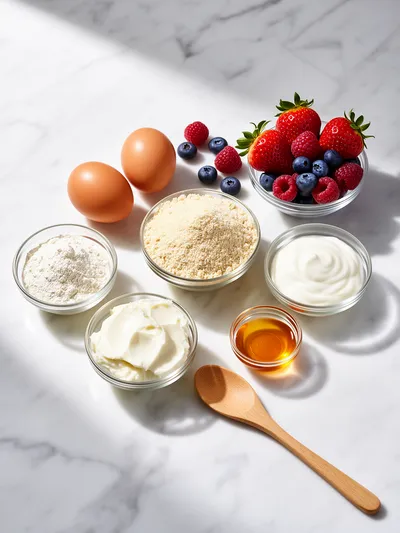
Essential Ingredient Guide
- Cream cheese: Choose full‑fat for silkiness; let it soften at room temperature for a smoother blend.
- Whey protein powder: A neutral‑flavored whey adds protein without altering the classic cheesecake taste.
- Almond flour: Provides a buttery crumb base while keeping the recipe gluten‑free.
- Vanilla extract: A few drops lift the flavor; use pure extract for the best aroma.
- Lemon juice: A splash brightens the filling and balances the richness.
- Honey: Adds gentle sweetness; you can reduce if you prefer a milder taste.

Complete Cooking Process
-
Ingredient Readiness:
Soften cream cheese, measure protein powder, and toast almond flour lightly before mixing.
-
Flavor Development:
Blend butter, almond flour, and honey for the crust, then whisk cream cheese with protein, vanilla, and lemon.
-
Texture Control:
Avoid over‑mixing the filling; stop once smooth to keep the interior airy.
-
Finishing Touches:
Chill the mini cheesecakes for at least two hours; finish with a drizzle of honey or fresh berries.
-
Serving Timing:
Serve cold, straight from the fridge, for the fullest flavor and texture contrast.
-
Use a food processor for an ultra‑smooth crust.
-
Add a pinch of sea salt to the filling for depth.
-
Freeze leftovers in airtight containers for up to a month.
-
Top with a dusting of cocoa powder for a subtle twist.
Pro Tips
These small adjustments make the difference between a good snack and a truly memorable bite. I often find that a quick whisk with a cold spoon gives the filling an extra silk feel, especially on humid days. Take your time, enjoy the aromas, and remember a gentle pause before the first taste.

The essence of the dish:
Light, creamy, and protein‑rich, each mini cheesecake delivers a melt‑in‑your‑mouth texture that feels both comforting and energizing.
A fun fact or historical angle:
The ancient Greek version used ricotta and honey; today we swap ricotta for cream cheese and add whey for a modern protein boost.
Flavor or sensory focus:
Expect a buttery, slightly nutty crust paired with a velvety, tangy‑sweet filling that whispers of vanilla and lemon.
You Must Know
-
Keep the filling at room temperature before mixing.
-
Press the crust firmly into each cup.
-
Chill long enough for the flavors to meld.
Frequently Asked Questions
→ Can I use a different protein powder?
Yes, a vanilla or unflavored whey works best; plant‑based options may change texture slightly.
→ Is this recipe truly gluten‑free?
All dry ingredients are almond flour and protein powder, both naturally gluten‑free. Just ensure your brand is certified.
→ How long can I store them?
Keep refrigerated in an airtight container for up to five days, or freeze for up to one month.
→ Can I add toppings?
Fresh berries, a drizzle of melted dark chocolate, or a sprinkle of toasted coconut all complement the flavor.
→ Do I need a springform pan?
No, silicone muffin tins or regular cupcake liners work perfectly for these mini versions.
→ What if I’m allergic to nuts?
Swap almond flour for oat flour or coconut flour; adjust the crust moisture accordingly.
Nutrition Facts
per serving
180
Calories
10g
Protein
12g
Carbs
11g
Fat
Taste Profile
A gentle blend of sweet and tangy with a buttery finish
Ingredient Substitutions
Don't have an ingredient? Try these alternatives
Provides a similar texture; may need a tiny bit more honey to bind.
Gives a subtle caramel note; use a little less as it’s thinner.
Recipe Variations
Try these delicious twists on the original
Spicy Version
Add a pinch of cayenne and a drizzle of honey for a sweet‑heat surprise.
Mediterranean Style
Stir in crumbled feta and chopped olives into the crust, then top with a thin slice of sun‑dried tomato.
Common Mistakes to Avoid
Learn from others' mistakes for perfect results
- Over‑mixing the filling which makes it dense.
- Skipping the chill step, resulting in a loose texture.
- Using cold cream cheese; it creates lumps.
Meal Prep & Storage
Make Ahead Tips
Prepare the crust and filling a day ahead; store the assembled cheesecakes, covered, in the fridge and add fresh toppings just before serving.
Leftover Ideas
Reheat gently in a microwave for 10‑15 seconds if you prefer a slightly warm center, or enjoy cold straight from the fridge.
Perfect Pairings
Serve this with...
Cooking Timeline
Prepare crust ingredients and press into mini tin.
Blend filling components until smooth.
Spoon filling over crusts and smooth tops.
Refrigerate to set; add toppings just before serving.
 Baking, Bread & Sweet Comforts
High Protein Cookie Dough
Nutritious cookie dough loaded with protein, easy to whip up and enjoy any time.
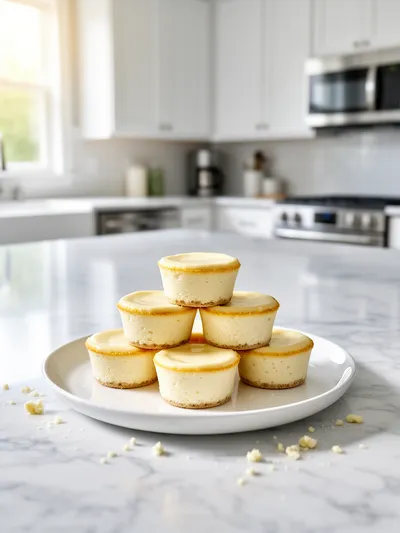
Mini Protein Cheesecakes
Fluffy mini protein cheesecakes that feel like a gentle hug—healthy, gluten‑free, and perfect for a guilt‑free sweet treat any time of day.
Timing
Prep Time
20 Minutes
Cook Time
0 Minutes
Total Time
2 Hours 20 Minutes
Recipe Details
Ingredients
Crust
-
01
1 cup almond flour
-
02
2 tbsp melted butter
-
03
1 tbsp honey
-
04
Pinch of sea salt
Filling
-
01
8 oz cream cheese, softened
-
02
1/2 cup Greek yogurt
-
03
1/2 cup vanilla whey protein powder
-
04
2 tbsp honey
-
05
1 tsp vanilla extract
-
06
1 tbsp fresh lemon juice
Topping (optional)
-
01
Fresh berries
-
02
Drizzle of melted dark chocolate
Instructions
Preheat the oven to 350°F (175°C) and line a 12‑cup mini muffin tin with paper liners.
In a bowl, combine almond flour, melted butter, honey, and a pinch of salt; mix until crumbly. Press the mixture firmly into each liner to form a thin crust.
In a large mixing bowl, beat softened cream cheese until smooth. Add Greek yogurt, vanilla whey protein, honey, vanilla extract, and lemon juice; whisk just until creamy.
Spoon the filling over each crust, smoothing the tops with a spatula.
Refrigerate the tin for at least two hours, or until the cheesecakes are set. Top with fresh berries or a chocolate drizzle before serving.
Notes & Tips
-
1
For a fluffier texture, fold a tablespoon of whipped egg whites into the filling.
-
2
If you prefer less sweetness, reduce honey to 1 tablespoon.
-
3
The mini cheesecakes can be frozen; thaw in the fridge before serving.
Tools You'll Need
-
Mini muffin tin
-
Paper liners
-
Mixing bowls
-
Hand mixer or whisk
-
Spatula
-
Measuring cups and spoons
Must-Know Tips
-
Don't over‑mix the filling; it can become dense.
-
Press the crust firmly to avoid cracks.
-
Taste the filling before adding extra honey.
Professional Secrets
-
Use room‑temperature cream cheese for a silky blend.
-
Chill the crust briefly before adding filling for better adhesion.
-
Add a dash of cream of tartar to stabilize the whipped yogurt.

Recipe by
Barbara WalkerCooking with heart and heritage 🥘❤️ Sharing nostalgic flavors, family comfort, and timeless kitchen love ✨
Get Delicious Recipes Weekly
Join 25,000+ home cooks getting our best recipes straight to their inbox.
Free forever • No spam • Unsubscribe anytime