
The mini sandwich has a surprisingly rich history dating back to the 19th century, when John Montagu, the 4th Earl of Sandwich, allegedly ordered meat between slices of bread so he could eat without leaving his gambling table. While the full-sized sandwich became a staple, it was the elegant tea parties of the Victorian era that popularized the dainty miniature version. These delicate finger sandwiches were designed specifically for social gatherings, allowing guests to mingle freely while enjoying small, polite bites. The tradition carried through the decades, evolving from cucumber-filled tea sandwiches to the hearty, juicy varieties we enjoy today at modern parties and celebrations.
Why You'll Love It
-
Perfect bite-sized portions that are easy to handle at parties
-
Incredibly versatile - you can customize with endless filling combinations
-
Make-ahead friendly, so you're not stuck in the kitchen during your own gathering
-
The juicy factor keeps them moist and delicious for hours
"My guests couldn't stop raving about these! They were the hit of the party and so easy to make."
Essential Ingredient Guide
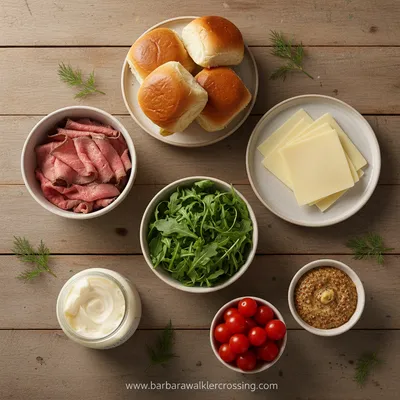
- Mini dinner rolls or slider buns: Look for soft, fresh buns that will hold up to the fillings without getting soggy. Hawaiian rolls work wonderfully for their slight sweetness and tender texture.
- Quality deli meats: Choose thinly sliced turkey, roast beef, or ham from your local deli counter. The better the meat, the more flavor your sandwiches will have.
- Cheese slices: Provolone, Swiss, or cheddar melt beautifully and add that creamy factor. Don't skimp on the cheese - it's what makes them extra special.
- Butter and seasoning blend: A mixture of softened butter with garlic powder, onion powder, and herbs creates that irresistible glaze that makes these sandwiches truly juicy.
- Worcestershire sauce: Just a splash adds depth and umami that elevates the whole experience. It's that secret ingredient that makes people ask 'what's in these?'
- Poppy seeds: Optional but traditional - they add a lovely texture and visual appeal to the finished sandwiches.
Complete Cooking Process
-
Ingredient Readiness:
Having everything at room temperature makes assembly smoother. The butter should be soft enough to spread easily, and the rolls should be fresh but not too warm.
-
Flavor Development:
The magic happens when the butter mixture melts into the bread and the cheese gets all gooey. That's when the flavors really marry together.
-
Texture Control:
Covering the pan while baking helps the cheese melt perfectly without drying out the bread. The steam keeps everything moist and tender.
-
Finishing Touches:
Letting them rest for just a few minutes after baking allows the juices to redistribute, making each bite perfectly balanced.
-
Serving Timing:
Serve warm when the cheese is still melty and the aromas are at their peak. They're best enjoyed within the first hour after baking.
-
Don't separate the rolls completely - slice them horizontally while still connected for easier filling
-
Spread the butter mixture right to the edges to prevent dry spots
-
Use a serrated knife for clean cuts through the assembled sandwiches
-
If making ahead, wrap tightly in foil and refrigerate, then bake just before serving
Pro Tips
I remember when I first started making these, I was so worried about them drying out. But you know what? The butter mixture creates this protective layer that keeps everything moist and delicious. Honestly, the hardest part is waiting for them to cool enough to handle - the smell just fills the whole house with that warm, welcoming aroma.
Over the years, I've found that people really appreciate having something they can just pick up and enjoy without needing a plate or utensils. It makes the whole gathering feel more relaxed and comfortable. And when you pair these with something like a creamy soup, you've got a complete meal that feels special without being fussy.
The essence of the dish:
What makes these mini sandwiches truly special is how they transform simple ingredients into something celebratory. It's that combination of warm, soft bread, melty cheese, and savory fillings that feels like a hug in every bite.
A fun fact or historical angle:
The concept of party sandwiches became particularly popular during the 1950s home entertaining boom, when hostesses sought impressive yet manageable foods for their cocktail parties and bridge clubs.
Flavor or sensory focus:
You'll notice the buttery aroma first, then the satisfying savory notes from the meat and cheese, followed by that perfect texture contrast between the soft bread and the slight crispness from baking.
You Must Know
-
The butter mixture is non-negotiable - it's what creates the signature juiciness
-
Don't overcook them - you just want everything warmed through and melted
-
Let them rest before serving to allow the flavors to settle
-
They're incredibly forgiving - almost any combination of meats and cheeses works
Frequently Asked Questions
→ Can I make these ahead of time?
Absolutely! You can assemble them completely, wrap tightly in foil, and refrigerate for up to 24 hours before baking. Add 5-10 minutes to the baking time if starting from cold.
→ What's the best way to reheat leftovers?
Wrap in foil and warm in a 300°F oven for 10-15 minutes. The microwave will make them soggy, so oven reheating is definitely the way to go.
→ Can I use different types of bread?
Yes! While slider buns are traditional, you can use small dinner rolls, mini croissants, or even cut larger sandwich rolls into smaller portions.
→ How do I prevent them from getting soggy?
The butter barrier helps a lot, but also make sure any wet ingredients (like tomatoes) are patted dry and placed in the middle, not touching the bread directly.
→ Can I make these vegetarian?
Definitely! Use grilled vegetables, marinated tofu, or your favorite meat substitutes. The method works beautifully with any fillings you choose.
→ How many should I plan per person?
For a party, plan on 2-3 per person if serving with other foods, or 4-5 if they're the main attraction. They're quite filling despite their small size.
Nutrition Facts
per serving
280
Calories
12g
Protein
18g
Carbs
18g
Fat
Taste Profile
Rich savory notes balanced by the slight sweetness of the bread with a buttery finish
Ingredient Substitutions
Don't have an ingredient? Try these alternatives
Different cheeses will bring varying levels of creaminess and flavor intensity
Will add a different but equally delicious umami flavor profile
Adds similar texture and visual appeal with different flavor notes
Recipe Variations
Try these delicious twists on the original
Italian Style
Use salami, pepperoni, and mozzarella with Italian seasoning in the butter mixture
Breakfast Version
Fill with scrambled eggs, bacon, and cheese for a brunch-friendly option
Hawaiian Twist
Use Hawaiian rolls with ham, pineapple, and Swiss cheese for a sweet-savory combination
Common Mistakes to Avoid
Learn from others' mistakes for perfect results
- Overbaking - they just need to warm through and melt the cheese
- Using cold butter - it won't spread evenly and may tear the bread
- Skipping the resting time - this step helps the flavors meld together
- Overfilling - too many layers can make them difficult to eat neatly
Meal Prep & Storage
Make Ahead Tips
You can assemble these completely up to 24 hours in advance. Wrap tightly in foil and refrigerate. Add 5-10 minutes to baking time if starting from cold. Perfect for stress-free party planning.
Leftover Ideas
Reheat gently in a 300°F oven wrapped in foil for 10-15 minutes. They also make great next-day lunches - just warm through to refresh the textures.
Perfect Pairings
Serve this with...
Cooking Timeline
Preheat oven and mix butter seasoning blend
Slice buns and assemble sandwiches with fillings
Bake covered for 15 minutes, then uncovered for final 5-7 minutes
Rest briefly before serving to allow settling
Serve warm and enjoy!

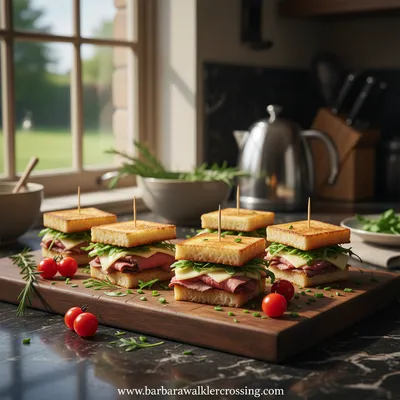
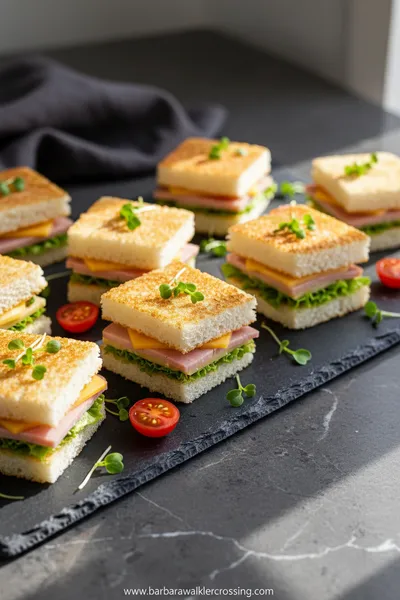
Juicy Mini Sandwiches: Perfect Party Food Ideas
These juicy mini sandwiches are the ultimate party food - perfectly sized, bursting with flavor, and incredibly simple to make. Perfect for gatherings where you want something special without the fuss.
Timing
Prep Time
15 Minutes
Cook Time
20 Minutes
Total Time
35 Minutes
Recipe Details
Ingredients
For the Sandwiches
-
01
12 mini slider buns or dinner rolls
-
02
1/2 lb thinly sliced turkey or roast beef
-
03
6 slices provolone or Swiss cheese, cut in half
-
04
1/2 cup unsalted butter, softened
-
05
2 teaspoons Worcestershire sauce
-
06
1 teaspoon garlic powder
-
07
1 teaspoon onion powder
-
08
1 tablespoon poppy seeds (optional)
-
09
1/4 teaspoon salt
-
10
1/4 teaspoon black pepper
Optional Additions
-
01
Thinly sliced onions or pickles
-
02
Mustard or mayonnaise for spreading
-
03
Fresh herbs like parsley or dill
Instructions
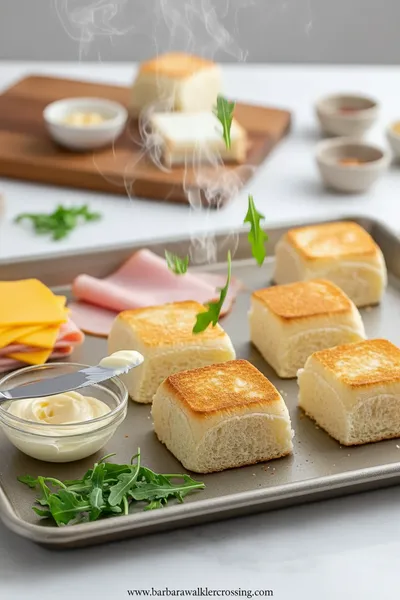
Preheat your oven to 350°F. Without separating the individual rolls, slice the entire sheet of connected buns horizontally in half using a serrated knife. Place the bottom half in a baking dish.
In a small bowl, mix together the softened butter, Worcestershire sauce, garlic powder, onion powder, poppy seeds, salt, and pepper until well combined.
Spread about half of the butter mixture evenly over the bottom layer of buns. Layer the meat evenly across, then add the cheese slices. If using any additional fillings like onions or pickles, add them now.
Place the top half of the buns over the fillings. Spread the remaining butter mixture evenly over the tops, making sure to cover all surfaces.
Cover the baking dish with foil and bake for 15 minutes. Remove the foil and bake for another 5-7 minutes until the tops are golden and the cheese is melted.
Remove from oven and let rest for 2-3 minutes. Use a sharp knife to separate into individual sandwiches if they're not already pre-cut. Serve warm.
Notes & Tips
-
1
These sandwiches freeze beautifully after baking. Just wrap tightly and freeze for up to 3 months.
-
2
For extra flavor, you can add a sprinkle of everything bagel seasoning or dried herbs to the butter mixture.
-
3
If your buns are particularly soft, you can toast them lightly before assembling to prevent sogginess.
 Baking, Bread & Sweet Comforts
High Protein Cookie Dough
Nutritious cookie dough loaded with protein, easy to whip up and enjoy any time.
Tools You'll Need
-
9x13 inch baking dish
-
Mixing bowls
-
Serrated knife
-
Measuring spoons
-
Rubber spatula
-
Aluminum foil
Must-Know Tips
-
Don't separate the rolls completely - keeping them connected makes assembly much easier
-
Let the butter come to room temperature naturally - microwaving can make it oily
-
Spread the butter mixture right to the edges to prevent dry spots on the crust
Professional Secrets
-
Room temperature ingredients ensure even melting and distribution of flavors
-
Covering with foil during the first part of baking creates steam that keeps everything moist
-
Letting them rest after baking allows the juices to redistribute throughout the sandwiches

Recipe by
Barbara WalkerCooking with heart and heritage 🥘❤️ Sharing nostalgic flavors, family comfort, and timeless kitchen love ✨
Get Delicious Recipes Weekly
Join 25,000+ home cooks getting our best recipes straight to their inbox.
Free forever • No spam • Unsubscribe anytime