
The origins of the ice cream birthday cake trace back to mid‑20th‑century American ice cream parlors, where celebratory scoops were layered with chocolate fudge and whipped topping. It became a staple of birthday celebrations, offering a cool alternative to traditional buttercream. Over the decades, home cooks have recreated the treat, adapting the classic layers for easy assembly. This modern rendition preserves the nostalgic flavor while adding a personal touch that feels both familiar and fresh.
Why You'll Love It
-
- No baking needed, just chill and serve
-
- Layers of vanilla ice cream and chocolate ribbon create texture contrast
-
- Easy to personalize with sprinkles or fresh fruit
-
- Turns any gathering into a cool celebration
"The cake melted in the best way – creamy, smooth, and just sweet enough for kids and adults alike."
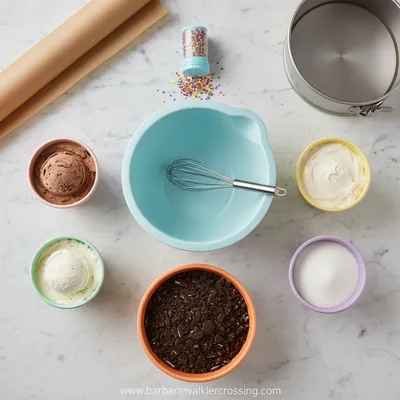
Essential Ingredient Guide
- Vanilla ice cream: Use a high‑quality, full‑fat vanilla for richness; let it soften slightly for easier spreading
- Chocolate fudge sauce: A homemade sauce adds depth; melt chocolate with a splash of cream for shine
- Whipped topping: Provides airy contrast; fold gently to keep lightness
- Birthday candles: Choose sturdy, short candles so they sit well on chilled surfaces
- Sprinkles or fresh berries: Add color and a burst of freshness right before serving
- A pinch of sea salt: Enhances the sweet‑cream balance without being noticeable

Complete Cooking Process
-
Ingredient Readiness:
Soften the vanilla ice cream for a few minutes, pre‑measure the fudge sauce, and have whipped topping ready in a chilled bowl.
-
Flavor Development:
Spread a thin layer of chocolate fudge on the bottom of the pan, letting its aroma settle before adding ice cream.
-
Texture Control:
Layer the softened ice cream gently, pressing down just enough to avoid air pockets, then drizzle more fudge.
-
Finishing Touches:
Top with whipped topping, scatter sprinkles, and place candles right before serving for that celebratory sparkle.
-
Serving Timing:
Allow the cake to firm in the freezer for at least 2 hours; slice with a warm knife for clean cuts.
-
Use a springform pan for easy removal
-
Freeze the cake on a tray first, then transfer to a decorative plate
-
If the ice cream is too hard, let it sit at room temperature for 5‑10 minutes before spreading
Pro Tips
Well, these little adjustments make the process feel almost ceremonial. I remember the first time I tried the springform method – the cake slipped out smoothly, and I felt a quiet pride. So, take your time, enjoy the cool scent of chocolate, and let the cake become the centerpiece of gentle celebration.

The essence of the dish:
A simple harmony of smooth vanilla ice cream, rich chocolate ribbon, and airy whipped topping that melts together in each bite, creating a cool, comforting dessert.
A fun fact or historical angle:
Dairy Queen introduced its iconic birthday cake in the 1970s, and it quickly became a go‑to treat for kids’ parties across America.
Flavor or sensory focus:
Expect the subtle sweetness of vanilla, the slight bitterness of chocolate, and a buttery, melt‑in‑your‑mouth texture that whispers of childhood.
You Must Know
-
Keep everything cold for clean layers
-
Use a warm knife for slicing
-
Let the cake rest before adding candles
Frequently Asked Questions
→ Can I use a different ice cream flavor?
Absolutely – strawberry or chocolate work well, just adjust the fudge layer to complement the flavor.
→ Do I need an ice cream maker?
No, a store‑bought premium vanilla works perfectly; just let it soften for easier spreading.
→ How long can the cake be stored?
Keep it sealed in the freezer for up to 3 days; bring it out a few minutes before serving for easier slicing.
→ Can I make a dairy‑free version?
Yes, use a coconut‑milk‑based vanilla ice cream and a dairy‑free chocolate sauce.
→ What pan size is best?
A 9‑inch springform pan gives a nice height and easy release.
→ How do I prevent ice crystals on the surface?
Cover the cake tightly with plastic wrap before freezing; this traps moisture and keeps the surface smooth.
Nutrition Facts
per serving
270
Calories
4g
Protein
28g
Carbs
15g
Fat
Taste Profile
Creamy, sweet, with a hint of chocolate richness
Ingredient Substitutions
Don't have an ingredient? Try these alternatives
Provides a dairy‑free alternative; may be slightly softer
Gives a buttery sweetness; reduce sea salt accordingly
Recipe Variations
Try these delicious twists on the original
Spicy Version
Add a dash of cayenne to the chocolate sauce for a subtle kick.
Mediterranean Style
Stir in crushed pistachios and a drizzle of honey for a fragrant twist.
Common Mistakes to Avoid
Learn from others' mistakes for perfect results
- Letting the ice cream become too hard – it won’t spread smoothly
- Skipping the final freeze – candles may sink
- Using a dull knife – slices will crumble
Meal Prep & Storage
Make Ahead Tips
You can assemble the cake up to 24 hours ahead; just keep it sealed in the freezer and add candles right before serving.
Leftover Ideas
Slice leftovers and serve immediately; they stay creamy for a short time before melting.
Perfect Pairings
Serve this with...
Cooking Timeline
Gather ingredients, line springform pan, and soften ice cream.
Spread ice cream layer evenly in pan.
Drizzle and swirl chocolate fudge.
Freeze for 1 hour, then add whipped topping.
Add final decorations, freeze 30 min, then slice.
 Baking, Bread & Sweet Comforts
High Protein Cookie Dough
Nutritious cookie dough loaded with protein, easy to whip up and enjoy any time.
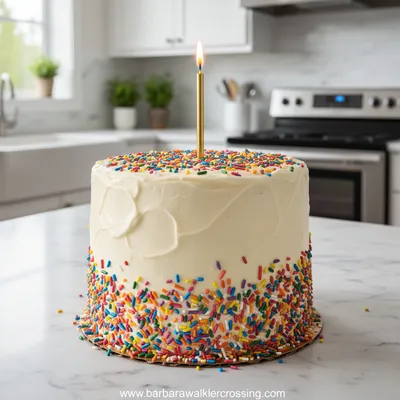
Ice Cream Birthday Cake – Creamy Copycat Dairy Queen
A silky, layered ice cream birthday cake that captures the nostalgic flavor of Dairy Queen, perfect for any celebration.
Timing
Prep Time
15 Minutes
Cook Time
0 Minutes
Total Time
2 Hours 15 Minutes
Recipe Details
Ingredients
Cake Layers
-
01
1 (2 qt) vanilla ice cream, softened
-
02
1/2 cup chocolate fudge sauce, homemade or store‑bought
-
03
1 cup whipped topping, chilled
Decoration
-
01
Birthday candles
-
02
Rainbow sprinkles or fresh berries
-
03
Pinch of sea salt
Instructions
Line a 9‑inch springform pan with parchment; press the softened vanilla ice cream into an even layer, smoothing the top with a spatula.
Drizzle half of the chocolate fudge over the ice cream, letting it pool slightly; gently swirl with a spoon for a marbled effect.
Freeze the pan for 1 hour until firm, then spread the whipped topping over the top, creating a fluffy blanket.
Add the remaining fudge in ribbons, sprinkle with rainbow sprinkles, and place candles just before serving.
Return the cake to the freezer for another 30 minutes to set the decorations; slice with a warm knife.
Notes & Tips
-
1
If the ice cream hardens too quickly, let the pan sit at room temperature for 5 minutes before slicing.
-
2
A warm, damp towel wrapped around the knife makes clean cuts easier.
-
3
Feel free to swap chocolate fudge for caramel sauce for a different flavor profile.
Tools You'll Need
-
9‑inch springform pan
-
Spatula
-
Sauce spoon
-
Freezer‑safe plastic wrap
-
Warm kitchen towel
Must-Know Tips
-
Don’t over‑mix the ice cream, keep it airy
-
Freeze the cake solid before adding candles
-
Taste the fudge sauce; a pinch of salt brightens chocolate
Professional Secrets
-
Use a metal bowl for the ice cream to speed softening
-
Warm the spatula slightly for smooth spreading
-
Cover the cake tightly to avoid freezer burn

Recipe by
Barbara WalkerCooking with heart and heritage 🥘❤️ Sharing nostalgic flavors, family comfort, and timeless kitchen love ✨
Get Delicious Recipes Weekly
Join 25,000+ home cooks getting our best recipes straight to their inbox.
Free forever • No spam • Unsubscribe anytime