
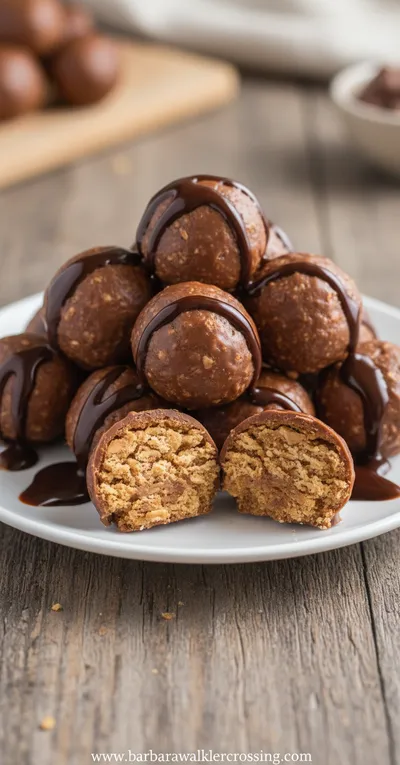
The Butterfinger candy bar has been an American favorite since its introduction in 1923, known for its unique flaky, crunchy texture that stands apart from other chocolate-covered treats. This no-bake version captures that distinctive crunch while adding a creamy dimension that makes them perfect for gatherings, gift-giving, or just satisfying your sweet tooth. The combination of textures and flavors has made these balls a beloved treat at potlucks and family gatherings for decades.
Why You'll Love It
-
No baking required - perfect for hot days
-
Uses simple pantry ingredients you likely already have
-
The perfect texture combination of crunchy and creamy
-
Great for making ahead and storing for sweet cravings
"My kids beg me to make these every week! They're the perfect after-school treat that comes together in minutes."
Essential Ingredient Guide
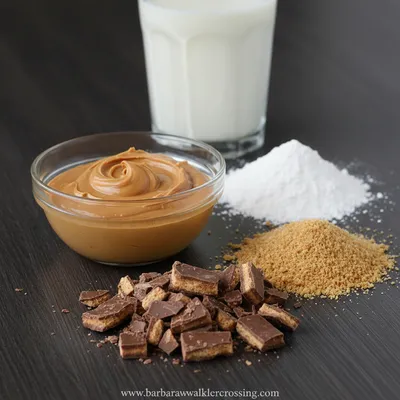
- Butterfinger candy bars: The star of the show - that distinctive flaky crunch is what makes these special. Look for the full-size bars rather than the fun-size for easier crushing.
- Cream cheese: Full-fat works best for holding everything together smoothly. Let it soften naturally on the counter for about 30 minutes before using.
- Powdered sugar: Adds sweetness and helps bind everything together without making the mixture too sticky. Sift it first to avoid lumps.
- Vanilla extract: Just a teaspoon enhances all the other flavors. Real vanilla makes a difference here.
- Chocolate coating: Use chocolate chips or melting wafers - the smooth coating provides the perfect contrast to the crunchy center.
- Peanut butter: Optional, but adds extra richness and complements the Butterfinger flavor beautifully.

Complete Cooking Process
-
Ingredient Readiness:
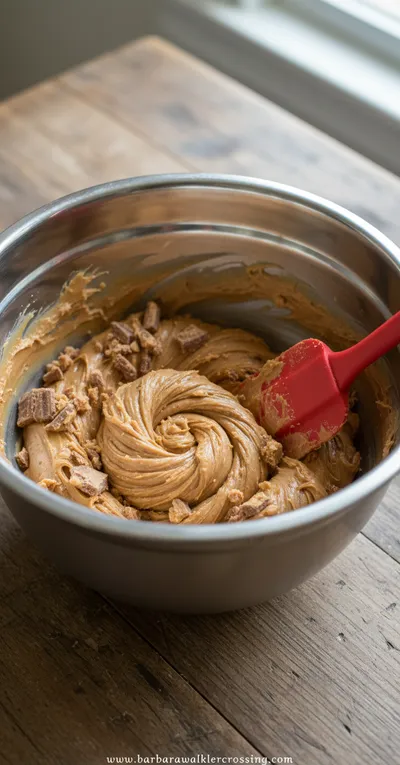
Everything should be at room temperature before you start - the cream cheese needs to be soft enough to blend smoothly, and the Butterfingers should be crushed into fine crumbs with some larger pieces for texture.
-
Flavor Development:
Mixing the crushed candy into the creamy base allows the flavors to meld. The chilling time is crucial - it lets the candy soften slightly and blend with the cream cheese, creating that perfect texture.
-
Texture Control:
Rolling the mixture while it's firm but not frozen gives you smooth balls that hold their shape. If it's too soft, chill longer; if too hard, let it warm up slightly.
-
Finishing Touches:
The chocolate coating sets the stage - make sure it's melted smoothly but not too hot, and work quickly before the balls start to soften.
-
Serving Timing:
Serve chilled for the best texture contrast - the cold creamy center against the crisp candy pieces is what makes these special.
-
Chill the mixture thoroughly before rolling - it makes handling much easier
-
Use a cookie scoop for uniform sizes that look professional
-
Let excess chocolate drip off completely to avoid pooling
-
Store layers separated by wax paper to prevent sticking
Pro Tips
I remember making these for my daughter's bake sale years ago - they were the first thing to sell out, and I had parents asking for the recipe all week. The secret is really in the chilling time, honestly. Don't rush it, even if you're tempted. That firmness makes rolling so much cleaner.
Another thing - if your kitchen is warm, work in small batches. Keep most of the mixture chilled while you're coating one batch at a time. The chocolate sets better when the balls are properly cold, giving you that nice snap when you bite into them.
 Baking, Bread & Sweet Comforts
High Protein Cookie Dough
Nutritious cookie dough loaded with protein, easy to whip up and enjoy any time.
The essence of the dish:
It's all about that magical combination of textures - the way the smooth cream cheese base gives way to the crispy Butterfinger pieces, all encased in a thin chocolate shell. It feels fancy but requires so little effort.
A fun fact or historical angle:
Butterfinger's unique texture comes from a special process that creates flaky, layered crunchy layers rather than the solid crunch of other candy bars.
Flavor or sensory focus:
The first thing you'll notice is the crisp chocolate shell giving way to the creamy interior, then that iconic Butterfinger crunch that crumbles perfectly in your mouth.
You Must Know
-
Don't skip the chilling steps - they're essential for the right texture
-
Crush the candy bars with some texture variation - not all powder
-
Use high-quality chocolate for coating - it makes a noticeable difference
-
Let the coated balls set completely before storing or serving
Frequently Asked Questions
→ Can I make these ahead of time?
Absolutely - they actually taste better after chilling overnight. The flavors have more time to develop and meld together beautifully.
→ How long do Butterfinger balls keep?
Stored properly in an airtight container in the refrigerator, they'll stay perfect for about 2 weeks. You can also freeze them for up to 3 months.
→ Can I use different candy bars?
Yes, but Butterfinger's unique texture is hard to replicate. Other crunchy candies work, but the result will be different. Crunchy peanut butter cups could be a fun variation.
→ My mixture is too sticky to roll - what went wrong?
It probably needs more chilling time, or you might need a bit more powdered sugar. Chill for another 30 minutes and try again.
→ Can I make these dairy-free?
You can try with dairy-free cream cheese alternatives, though the texture might be slightly different. Look for one that's firm when chilled.
→ What's the best way to crush the candy bars?
Place them in a zip-top bag and use a rolling pin or meat mallet. Don't crush them too finely - you want some texture variation.
Nutrition Facts
per serving
180
Calories
2g
Protein
22g
Carbs
9g
Fat
Taste Profile
Sweet and creamy with that signature Butterfinger peanut butter flavor
Ingredient Substitutions
Don't have an ingredient? Try these alternatives
May affect texture slightly - choose one that firms up when chilled
Texture and flavor will be different but still delicious
Recipe Variations
Try these delicious twists on the original
Peanut Butter Version
Add extra peanut butter to the mixture for a stronger peanut flavor that complements the Butterfinger perfectly.
White Chocolate Coating
Use white chocolate instead of dark for a different flavor profile and visual appeal.
Common Mistakes to Avoid
Learn from others' mistakes for perfect results
- Not chilling mixture enough before rolling - results in sticky mess
- Over-melting chocolate - can cause it to seize or become grainy
- Crushing candy too finely - loses the signature Butterfinger texture
- Rushing the setting process - chocolate coating won't set properly
Meal Prep & Storage
Make Ahead Tips
You can make these up to 2 weeks ahead and store in the refrigerator. They actually improve in flavor after a day or two.
Leftover Ideas
Store remaining balls in an airtight container in the refrigerator. They maintain their texture well for up to 2 weeks.
Perfect Pairings
Serve this with...
Cooking Timeline
Prep ingredients - crush candy bars, soften cream cheese, measure everything out
Mix cream cheese base with powdered sugar and vanilla until smooth
Combine with crushed candy bars and chill mixture thoroughly
Roll chilled mixture into balls and prepare chocolate coating
Dip balls in chocolate and let set completely before serving
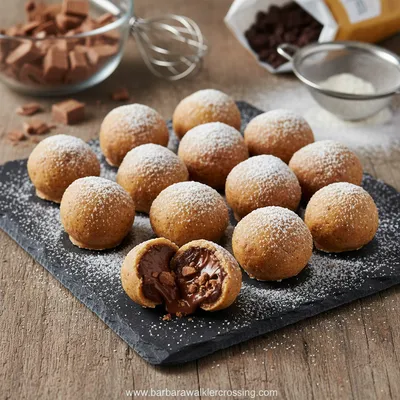
Butterfinger Balls Recipe
These no-bake Butterfinger balls combine crunchy candy sweetness with creamy indulgence for a treat that's simple to make and impossible to resist.
Timing
Prep Time
20 Minutes
Cook Time
0 Minutes
Total Time
1 Hour 20 Minutes (including chilling)
Recipe Details
Ingredients
For the Balls
-
01
8 full-size Butterfinger candy bars, crushed
-
02
8 oz cream cheese, softened
-
03
2 cups powdered sugar
-
04
1 tsp vanilla extract
-
05
1/4 cup creamy peanut butter (optional)
For Coating
-
01
2 cups chocolate chips or melting wafers
-
02
1 tbsp coconut oil or shortening
Instructions
Crush the Butterfinger bars into coarse crumbs using a zip-top bag and rolling pin. You want some texture - not all fine powder. Set aside.
In a medium bowl, beat the softened cream cheese until smooth. Add powdered sugar and vanilla, mixing until well combined. If using peanut butter, add it now.
Stir in the crushed Butterfinger pieces until evenly distributed throughout the mixture. Cover and refrigerate for at least 1 hour, until firm enough to handle.
Using a small cookie scoop or tablespoon, roll the chilled mixture into 1-inch balls. Place on a parchment-lined baking sheet and return to refrigerator while you melt the chocolate.
Melt chocolate chips with coconut oil in a double boiler or microwave, stirring until smooth. Dip each ball into the chocolate, coating completely, and return to parchment paper.
Let the chocolate set completely before serving - you can speed this up by refrigerating for 15-20 minutes. Store in an airtight container in the refrigerator.
Notes & Tips
-
1
Make sure cream cheese is properly softened for smooth mixing
-
2
Chill mixture thoroughly before rolling - this prevents sticking
-
3
Use high-quality chocolate for best melting and setting results
-
4
Let excess chocolate drip off completely to avoid pooling
Tools You'll Need
-
Mixing bowls
-
Electric mixer or whisk
-
Zip-top bag
-
Rolling pin
-
Baking sheet
-
Parchment paper
-
Double boiler or microwave-safe bowl
Must-Know Tips
-
Chill mixture thoroughly - Makes rolling much easier and cleaner
-
Crush candy with texture - Keep some larger pieces for that authentic Butterfinger crunch
-
Work in batches - Keep most mixture chilled while coating to maintain shape
Professional Secrets
-
Room temperature cream cheese - Ensures smooth blending without lumps
-
Proper chocolate tempering - Creates that perfect snap when you bite in
-
Even coating technique - Rotate balls gently for uniform chocolate coverage

Recipe by
Barbara WalkerCooking with heart and heritage 🥘❤️ Sharing nostalgic flavors, family comfort, and timeless kitchen love ✨
Get Delicious Recipes Weekly
Join 25,000+ home cooks getting our best recipes straight to their inbox.
Free forever • No spam • Unsubscribe anytime